- Single-project application – A stand-alone project targeting the secure software model. Follow the proj_cm33_s project configuration in this case.
- Dual-project application – A multi-core application consisting of two
inner projects:
- proj_cm33_s – TrustZone Secure project
- proj_cm33_ns – TrustZone Non-Secure project
For more details about TrustZone technology, refer to the Arm® website: https://www.arm.com/technologies/trustzone-for-cortex-m.
In addition to the TrustZone technology from Arm, PSOC™ Control C3 devices have various security life cycle stages (LCS). For more details about security, refer to Application Note AN240106 - Getting started with PSOC™ Control C3 security.
The following sections provide details about working with a device with the default out of the box policy versus a device that has been provisioned.
Configure and build projects
Single-core application
- FPU: VFPv5 single precision
- DSP Extension: selected
- Mode: Secure
Close the options dialog, and select Project > Make to build the application.
Multi-core application
After the application has been created, configure and build the secure CM33 project first and then the non-secure CM33 project. The CM33 project may contain a non-secure-callable file, and it must be built before the non-secure CM33 project.
- Select the secure CM33 project, open the Options dialog, and go to
General Options > 32-bit. Select:
- FPU: VFPv5 single precision
- DSP Extension: selected
- Mode: Secure
- Switch to Linker > Output tab, and verify that the TrustZone import library is set.
- Click OK to close the Options dialog.
- Build using Project > Make on the main menu, and this generates the library file and hex file for secure cm33 project.
- Select the non-secure CM33 project, open the Options dialog, and go to
General Options > 32-bit. Select:
- FPU: VFPv5 single precision
- DSP Extension: selected
- Mode: Non-secure
- Switch to Linker > Library tab. Under Additional libraries, click the ellipsis button [ . . . ] and navigate to the TrustZone import library file in the main_cm33_s/Debug/Exe folder.
- Click OK to close the Options dialog.
- Build using Project > Make on the main menu.
Device with default policy
Devices are shipped with a default policy, so you can develop and debug your application repeatedly without any knowledge about security or code signing. There is nothing to configure before programming and debugging in this state. Go the Program and debug section.
Provisioned device
If you have provisioned the device, the hex file must be signed with the same key used during provisioning using the ModusToolbox™ Edge Protect Security Suite. Use the Basic Secure Application as your reference; it automatically configures signing steps in the application.
On the IAR main menu, select Project > Make to build the application.
Go the Program and debug section.
Program and debug
Select debugger options
Before programming and debugging, select the default debugger options for your desired probe. See Supported debugger probes.
Fix vector table
Secure CM33 project
There is a known issue with an invalid for IAR name for the vector table in the C start-up code. To resolve it:
- Select the secure CM3 project, open the Options dialog, and select the Debugger item under Category.
- Select the Extra Options
tab, select the Use command line options
check box, and paste the following command-line
option:
--drv_vector_table_base=__Vectors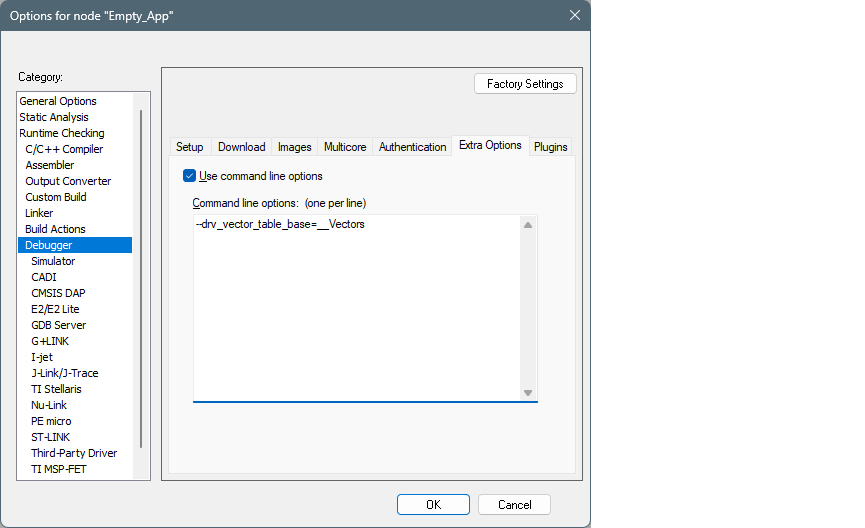
- Click OK to close the Options dialog.
Non-secure SM33 project
- Open the .map file of the secure CM33 application (usually located in the
main_cm33_s\Debug\List folder) and find the address in it that corresponds to
the symbol `__Vectors`.Note:The current step is a workaround for the following problem. IAR starts debugging based on the vector table (object named '__vector_table'). For a non-secure application, the object named '__vector_table' must point to the secure application's vector table. Otherwise, execution of the secure application will simply be skipped during debugging.
- Select the non-secure CM3 project, open the Options dialog, and select the Debugger item under Category.
- Switch to the Extra Options tab, select the
Use command line options check box, and paste the
following command-line parameter, specifying the actual address found for
`__Vectors`. symbol in the .map
file.
--drv_vector_table_base=0x12000000Note:For MP4/I-jet you could paste the following line instead.--drv_vector_table_base=__Vectors - Click OK to close the Options dialog.
Use dual-bank mode
- Open the Options dialog and select the Debugger item under Category.
- Select the Download tab and select the
Override default .board file check box.
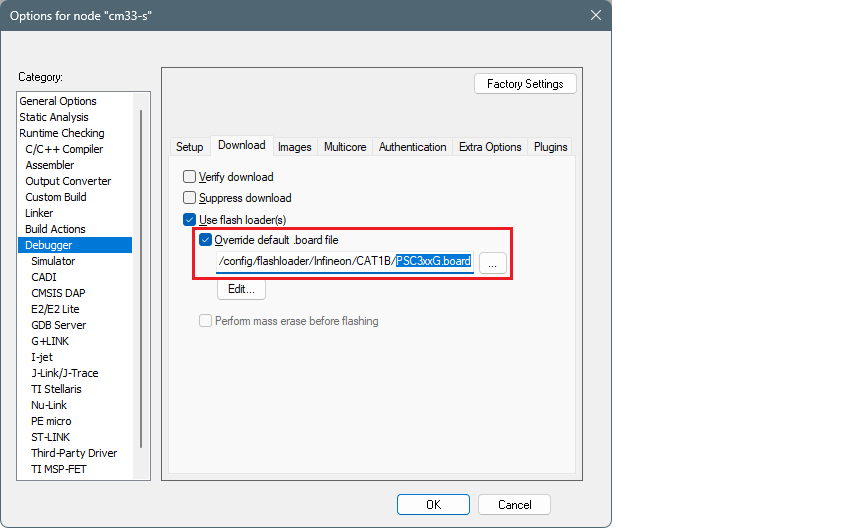
- Identify the default .board file currently used for this project (for
example, PSC3xxG.board).
- Click the Browse […] button, then navigate to
and select the same .board file that also includes "DBM".
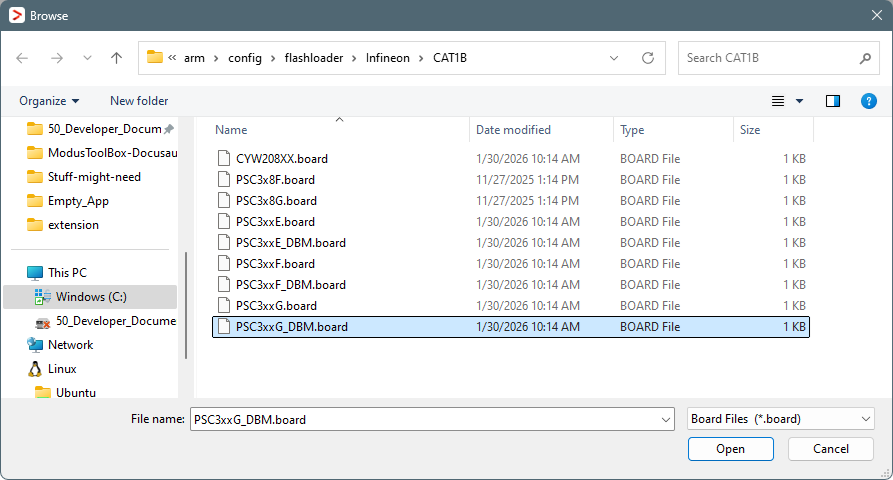
- Click Open.
- Click the Browse […] button, then navigate to
and select the same .board file that also includes "DBM".
- Click OK to close the Options dialog.
Program and debug
- Select Project > Build
Target to build the application.
- Select Project > Download > Download
file… and select the [project_name.hex
file in [application_folder]/build/last_config (you might
have to switch to All Files (*.*)).Note:This programming method should only be used when the application has a signer combiner. In other cases, the Download current application button should be enough.
- Select Project >Debug without Downloading.