Getting Started
This section covers the ways to get started using IAR Embedded Workbench with ModusToolbox™ software.
Create new application
Creating an application includes several steps, as follows:
Step 1: Open Project Creator tool
The ModusToolbox™ Project Creator tool is used to create applications based on code examples and template applications. You can open the Project Creator tool from the Windows Start menu, or by launching the executable. By default, the tool is installed in the following directory:
<user_home>/ModusToolbox/tools_<version>/project-creator
The tool is provided in GUI form and as a command line interface. For more details, refer to the
Project Creator user guide
.
Note:
You can also launch the Project Creator tool from the ModusToolbox™ Dashboard. Refer to the
Dashboard user guide
for details.
Step 2: Choose Board Support Package (BSP)
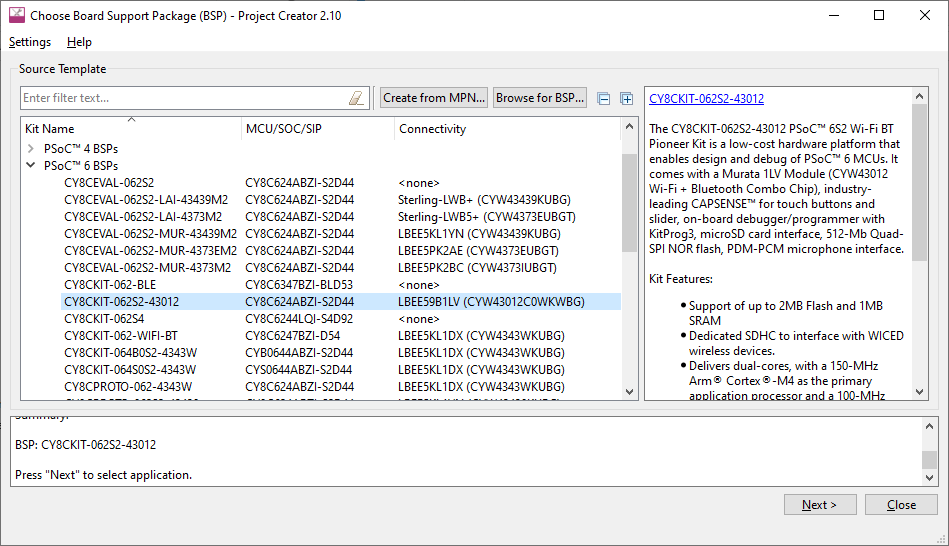
When the Project Creator tool opens, expand one of the BSP categories under
Kit Name
and select an appropriate kit; see the description for it on the right. The following image is an example; the precise list of boards available in this version will reflect the platforms available for development. You can also create a new BSP or browse for one on disk.

For this example, select the
CY8CKIT-062S2-43012
kit.
Step 3: Select application
To select an application:
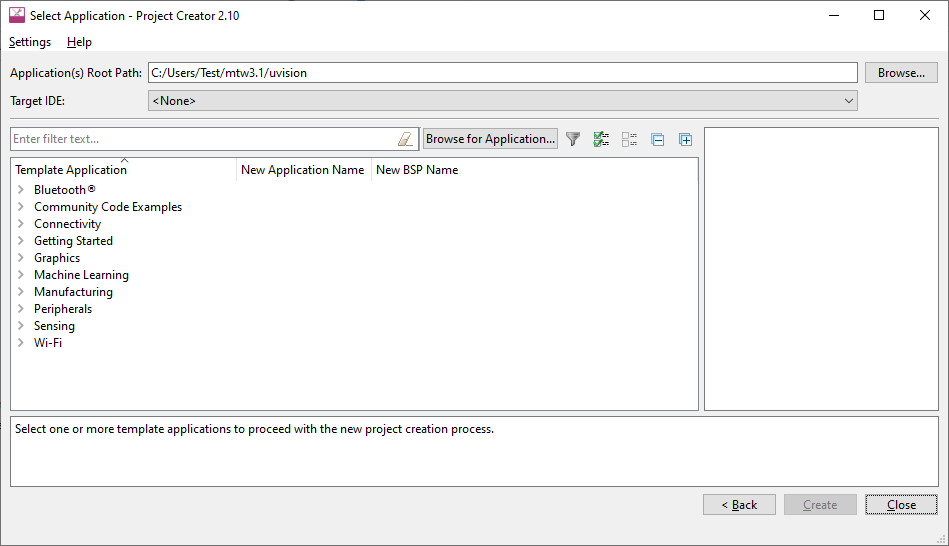
Click
Next >
to open the Select Application page.

This page displays example applications, which demonstrate different features available on the selected BSP. In this case, the CY8CKIT-062S2-43012 provides the PSOC™ 62 MCU and the AIROC™ CYW43012 Wi-Fi & Bluetooth® combo chip. You can create examples for PSOC™ 6 MCU resources such as CAPSENSE™ and QSPI, as well as numerous examples for other capabilities.
Click
Browse…
next to
Application(s) Root Path
to create or specify a folder where the application will be created.
Pull down the
Target IDE
menu, and select
ARM MDK (uVision)
.

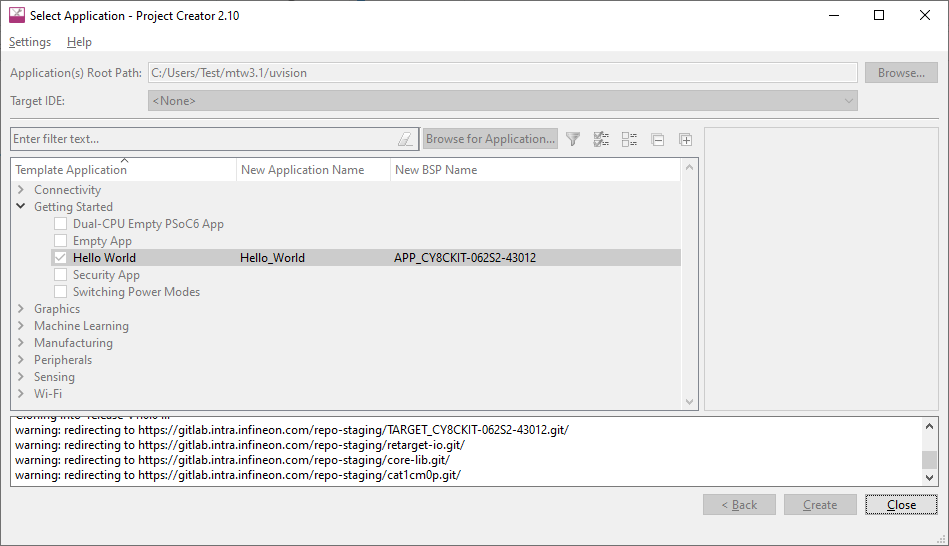
Under the
Template Application
column, expand
Getting Started
and select
Hello World
from the list. This example exercise uses the PSOC™ 6 MCU to blink an LED.
Note:
The actual application names available might vary.
Type a name for your application and/or BSP, or leave the default names. Do not use spaces. Also, do not use common illegal characters, such as:
* . " ‘ / \ [ ] : ; | = ,
Step 4: Create application
To create the application:
Click
Create
.

The tool displays various messages.
When the process completes, a message states that the application was created.
Click
Close
to exit the Project Creator tool.
Export existing application
If you have a ModusToolbox™ application that was created for another IDE or for the command line, you can export that application to be used in µVision. Open a terminal window in the application directory, and run the command
make uvision TOOLCHAIN=ARM
.
Note:
For applications that were created using core-make-3.0 or older, you must use the
make uvision5
command instead.
This sets the TOOLCHAIN to ARM in the Keil µVision configuration files but not in the ModusToolbox™ application’s Makefile. Therefore, builds inside Keil µVision will use the ARM toolchain while builds from the ModusToolbox™ environment will continue to use the toolchain that was previously specified in the Makefile. You can edit the Makefile’s
TOOLCHAIN
variable if you also want ModusToolbox™ builds to use the ARM toolchain.
Check the output log for instructions and information about various flags.
Open application in Keil µVision
Creating or exporting the application generates the following file in the application/project directory:
mtb-example-psoc6-hello-world.cprj
Note:
If you're working with a multi-core or multi-project application, a cprj file is created in each sub-project directory. See
Opening µVision multi-core projects
for instructions instead.
extension should have the association enabled to open it in Keil µVision
The
cprj
file extension should have the association enabled to open it in Keil µVision.
extension should have the association enabled to open it in Keil µVision
Double-click the
mtb-example-psoc6-hello-world.cprj
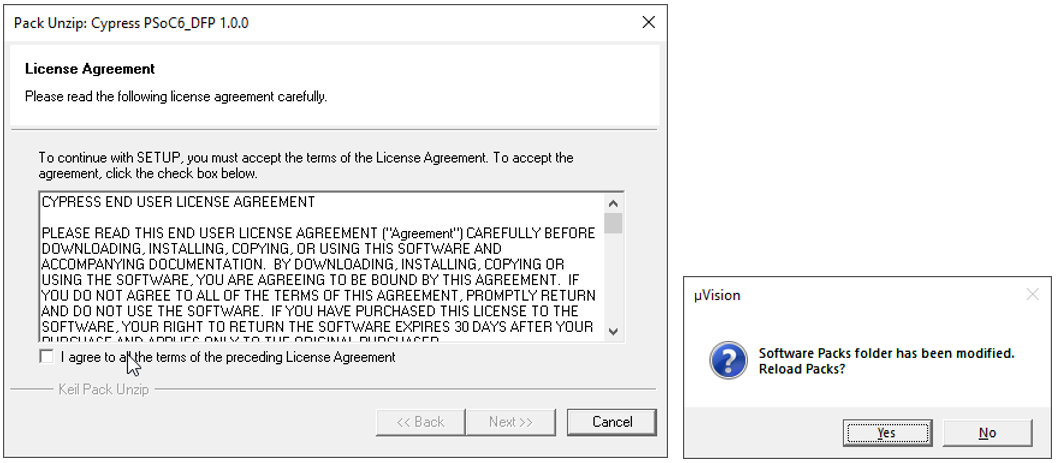
file. This launches the Keil µVision IDE. The first time you do this, the following dialog displays:

Click
Yes
to install the device pack. You only need to do this once.
Follow the steps in the Pack Installer to properly install the device pack.

When complete, close the Pack Installer and close the Keil µVision IDE.
Then double-click the .
cprj
file again and the application will be created for you in the IDE.