Getting started
Connect the device
Connect the host computer to a probe or kit device; e.g. KitProg3 kit with the PSOC™ 6 MCU target, used in the following examples. Make sure that the target MCU is attached to your probe.
List the connected targets
This example displays the target names available for the PSOC™ 6 MCU connected to the KitProg3 programmer. The programmer communicates with the PSOC™ 6 MCU over the SWD interface.
Windows:
Open a command-line window, enter the following command to change the directory to the ModusToolbox™ Programming tools or ModusToolbox™ tools installation folder:
cd %installation folder%\openocd\binRun the following command:
openocd -s ../scripts -f interface/kitprog3.cfg -f target/infineon/cy8c6xxx.cfg -c "targets; shutdown"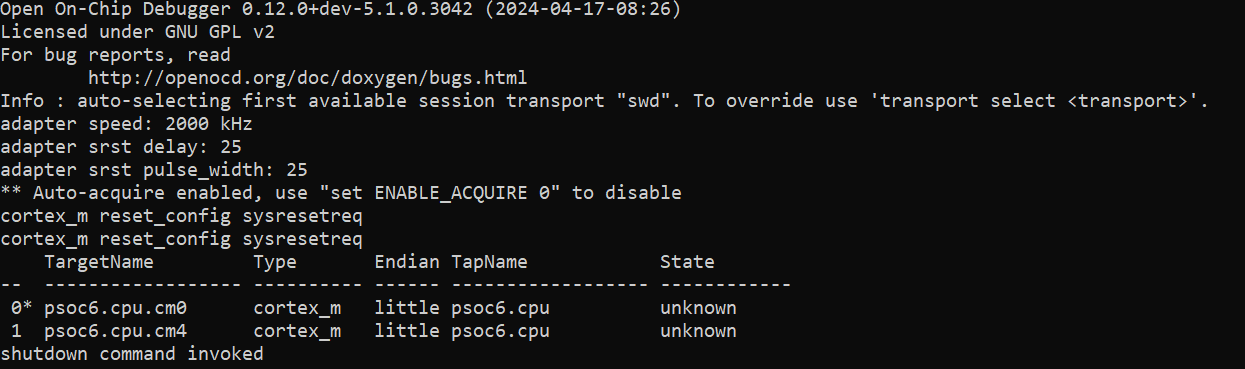
The command output displays the list of target names (JTAG TAPs) defined for/attached to the programming device.
Linux:
Open the terminal window, go to the directory where ModusToolbox™ Programming tools package is installed (for example, ~/openocd/bin).
Run the following command:
./openocd -s ../scripts -f interface/kitprog3.cfg -f target/infineon/cy8c6xxx.cfg -c "targets; shutdown"
The command output displays the list of target names (JTAG TAPs) defined for/attached to the programming device.
macOS:
Open the terminal window, go to the directory where the ModusToolbox™ Programming tools package is installed (for example, ~/openocd/bin).
Run the following command:
./openocd -s ../scripts -f interface/kitprog3.cfg -f target/infineon/cy8c6xxx.cfg -c "targets; shutdown"
The command output displays the list of target names (JTAG TAPs) defined for/attached to the programming device.
Program the target MCU
These examples show how to initialize the KitProg3 probe with different MCUs, program the flash with the appropriate
firmware_[device].hex
file, verify the programmed data, and finally shut down the OpenOCD programmer.
Example (KitProg3 & PSOC™ Edge MCU):
openocd -s ../scripts -f interface/kitprog3.cfg -c "set SMIF_BANKS { 0 {addr 0x60000000 size 0x01000000 psize 0x00000200 esize 0x00040000} }" -f target/infineon/pse84xgxs2.cfg -c "program c:/hex/firmware_pse8.hex verify exit"
Example (KitProg3 & PSOC™ 6 MCU
openocd -s ../scripts -f interface/kitprog3.cfg -f target/infineon/cy8cxxa.cfg -c "program c:/hex/firmware_psoc6.hex verify exit"
Example (KitProg3 & PSOC™ 64 "Secure Boot" MCU
openocd -s ../scripts -f interface/kitprog3.cfg -f target/infineon/cyxx64x7.cfg -c "program cd:/hex/firmware_psoc64.hex verify exit"
Note:
The cyxx64x7.cfg configuration file programming of the internal flash is performed via the SYS_AP access port. OpenOCD will not affect CM0_AP and CM4_AP by default, so both cores will not be visible to OpenOCD. Choose the access port using the
TARGET_AP
variable.
Programming of the external memory is done by the flash loader, so the CM4 access port must be used for QSPI memory programming. After choosing the CM4 access port, the QSPI memory bank will be exposed automatically.
Example (KitProg3 & PSOC™ 4 MCU
openocd -s ../scripts -f interface/kitprog3.cfg -f target/infineon/psoc4.cfg -c "program cd:/hex/firmware_psoc4.hex verify exit"
Using configuration files only
The whole configuration can be stored in a single
sample.cfg
file. This approach is useful, when the operations to be performed will be repeated without any change.
For example, the following configuration file describes the PSOC™ Edge MCU connected using the KitProg3 debug probe. This file initializes the target device, programs the flash with the
firmware.hex
file, verifies programmed data, and finally shuts down the OpenOCD programmer.
source [ find interface/kitprog3.cfg ]
transport select swd
set SMIF_BANKS { 0 {addr 0x60000000 size 0x01000000 psize 0x00000200 esize 0x00040000} }
source [ find target/infineon/pse84xgxs2.cfg]
program d:/firmware.hex verify exit
Execute the following command:
openocd -s ../scripts -f path/to/sample.cfg
Using configuration files and command line
A significant part of the configuration file specifies the debug adapter, transport type, target chip, SWD frequency, reset type, etc. This part of the file reflects the hardware configuration and thus stays unchanged between sessions. In some cases, a combined method of passing the Tcl commands is more convenient.
For more information on Tcl scripting, see
Tcl Crash Course
.
The example
sample.cfg
file contents:
source [ find interface/kitprog3.cfg ]
transport select swd
set SMIF_BANKS { 0 {addr 0x60000000 size 0x01000000 psize 0x00000200 esize 0x00040000} }
source [ find target/infineon/pse84xgxs2.cfg]
Execute the following command:
openocd -s ../scripts -f path/to/sample.cfg -c "program d:/firmware.hex verify exit"
Using multiple commands
In general, OpenOCD can execute multiple commands defined using Tcl or defined in configuration files. The order of execution is subsequent and defined by the inclusion in the OpenOCD command.
So, in the following example, the commands defined in the
sample.cfg
file will be executed first, and the programming operation second:
openocd -s ../scripts -f path/to/sample.cfg -c "program d:/firmware.hex verify exit"
Remote debugging
Remote debugging is described for Eclipse and VS Code in the KBA
Remote debugging a ModusToolbox™ application
.