Configure applications
This chapter covers how to make various changes to your application. It includes:
Modify code
Most code examples work as they are, and there is no need to add or modify code in order to build or program them. However, if you want to update and change an application to do something else, or if you are developing your own application, open the appropriate file in the code editor.
PSOC™ MCU : In the Project Explorer, double-click the main.c file.

Note:
The "includes" in this example show "unresolved inclusions" because the files are located in the mtb_shared folder. This and other issues with IntelliSense are resolved after a build.
AIROC™ Bluetooth® : In the Project Explorer, expand the <app-name> project folder and double-click the application <app-name>.c file.
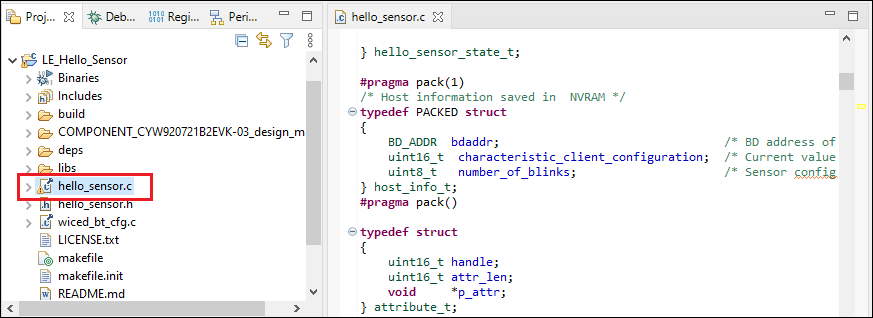
As you type into the file, an asterisk (*) will appear in the file’s tab to indicate changes were made. The
Save/Save As
commands will also become available to select.
Note:
C/C++ Search is no longer supported by ModusToolbox™ Eclipse due to programmatic disabling of indexing. You should disable C/C++ Search via the
Search > Search > Customize
menu. Other search types are not affected.
How-to set configuration options
Since a ModusToolbox™ application is based on the GNU-make system, most of the project configuration is controlled by editing the Makefile. This section contains common configuration options that Eclipse users need to be aware of. For more information about the ModusToolbox™ build system, see chapter five in the
tools package user guide.
Configuring Toolchains
ModusToolbox™ software provides GCC_ARM as the default toolchain to use with Eclipse. If you have a different toolchain you prefer, update the makefile to point to the appropriate toolchain.
Using GCC_ARM
If you have both GCC 11 and GCC 14 installed, ModusToolbox™ software will use GCC 14 by default, and you do not need to specify the path variable. However, if you want to use GCC 11 and GCC 14 is also installed, you must specify the following path variable:
CY_COMPILER_GCC_ARM_DIR=[Path to GCC_ARM install]
Using ARM
To use ARM, specify the following variables:
TOOLCHAIN=ARM
CY_COMPILER_ARM_DIR=[Path to ARM install]
Using LLVM
To use LLVM, specify the following variables:
TOOLCHAIN=LLVM_ARM
CY_COMPILER_LLVM_ARM_DIR=[Path to LLVM install]
Specify debug and release configurations
Edit the project/application
Makefile
CONFIG
parameter. Valid options are: Debug, Release, and Custom. If you set the value to Custom, then also set the optimization flag in the
CFLAGS
variable.
Note:
Do not use the global configuration
Debug/Release
menu items, and do not use the
Project > Build Configurations
option. These are both ignored.
Exclude files/folders from build
By default, a ModusToolbox™ application includes a
.cyignore
file that specifies files and folders to exclude from a build. You can add entries to this file. You can also edit the
Makefile
to add
CYIGNORE
make variables.
Do not use
Resource Configurations > Exclude From Build...
This will be ignored.
Specify linker settings (including per-file linker settings)
Edit the project/application
Makefile
for these variables:
CFLAGS
,
CXXFLAGS
,
ASFLAGS
,
LDFLAGS
There is no other way to specify linker settings in Eclipse.
Specify probe and generate launch configs
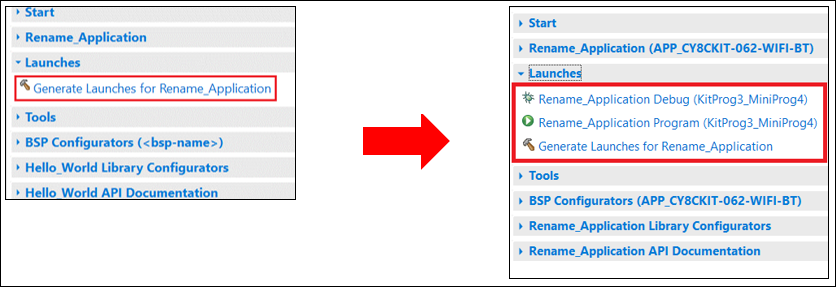
Most PSOC™-based kits use KitProg3/MiniProg4 as the default programmer/debugger, and they show those configurations in the Quick Panel:
Switch to J-Link programmer/debugger
If you want to use SEGGER J-Link as the programmer/debugger, do the following to change configurations:
Open your ModusToolbox™ application's bsp.mk file, and type the following variable:
BSP_PROGRAM_INTERFACE=JLinkAlso enter the following variable to specify the location of where J-Link will be installed:
MTB_JLINK_DIR=<path to J-Link>Save the bsp.mk file.
Click
Generate Launches for <project_name>
.
When Eclipse refreshes, J-Link configurations will be shown.
Note:
There is no other way to specify J-Link in Eclipse.
Switch back to KitProg3
If you want to switch back to KitProg3, delete the variables you entered above and regenerate the launch configurations.
Configure search paths
Source files under the project root directory are automatically included into a build. Additional files/directories can be added to the search path using the
SEARCH
make variable.
Do not add a source file to the project as a link (for example, by dragging and dropping a file into a project and selecting
Link to files
). This will be ignored.
Use configurators
ModusToolbox™ software provides graphical applications called configurators that make it easier to configure a hardware block. However, before you make changes to settings in configurators, you should first copy the configuration information to the application and override the BSP configuration or create a custom BSP. If you make changes to a standard BSP library, it will cause the repo to become dirty. Additionally, if the BSP is in the shared asset repository, changes will impact all applications that use the shared BSP. For more information, refer to the
ModusToolbox™ tools package user guide
.
Each configurator provides a separate guide, available from the configurator's
Help
menu.
Launching configurators from Eclipse
To launch a configurator from Eclipse, right-click on the <app-name> project in the Project Explorer, select ModusToolbox™ , and then select the appropriate configurator.
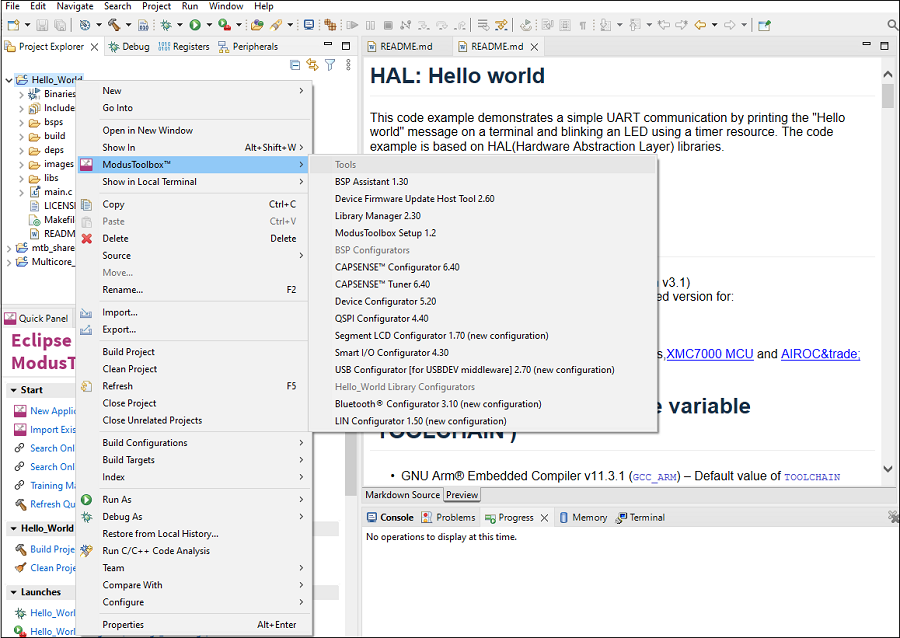
Note:
You can also launch available configurators from links in the Quick Panel.
Depending on the enabled resources in your application, there may be several configurators available to launch.
If you launch the Device Configurator from Eclipse, you are opening the project’s design.modus file, which is responsible for holding all of the BSP configuration information. It contains the following:
Selected device
Resource parameters
Constraints
If you launch any of the other configurators from Eclipse, they will open using that configurator’s configuration file ( design.cycapsense , design.cyseglcd , etc.). These files are specific to the given resource, and they may rely on configuration data from the design.modus file.
Launching configurators without Eclipse
To launch any Configurator without using Eclipse, refer to the applicable configurator guide for details about configuration information. You may need to open a configuration file or create a new one.
Use tools
In addition to the configurators, there are several tools, including Library Manager, BTSpy, ClientControl, and Device Firmware Update (DFU) Host Tool. Many tools do not apply to all types of projects. So, the available tools depend on the project/application you have selected in the Project Explorer.
Launching tools from Eclipse
To launch a tool from Eclipse, right-click on the <app-name> project in the Project Explorer, select
ModusToolbox™
, and then select the appropriate tool.

Note:
You can also launch available tools from links in the Quick Panel.
Library Manager
The Library Manager allows you to select which Board Support Package (BSP) and version should be used by default when building a ModusToolbox™ application. It also allows you to add and remove libraries, as well as change their versions.
For more information about how to use this tool, refer to the
Library Manager user guide.
BTSpy and ClientControl
BTSpy is a trace utility that can be used in the AIROC™ Bluetooth® applications to view protocol and generic trace messages from the embedded device. The tool listens on the UDP port 9876 and can receive specially formatted message from another application on the same or different system.
BTSpy can be used in conjunction with ClientControl to receive, decode and display protocol application and stack trace messages. ClientControl communicates with the embedded app to perform various functionalities, tests, exercising features, etc.
DFU Host tool
The Device Firmware Update (DFU) Host tool is a stand-alone program used to communicate with a PSOC™ MCU that has already been programmed with an application that includes device firmware update capability. For more information, refer to the
Device Firmware Update Host tool user guide
.
Use integrated terminal
Eclipse for ModusToolbox™ software includes an integrated terminal where you can enter various commands for the selected project. To view the terminal, click the
Terminal
tab in the bottom pane. Then, select a project in the Project Explorer to open a shell in the project directory.
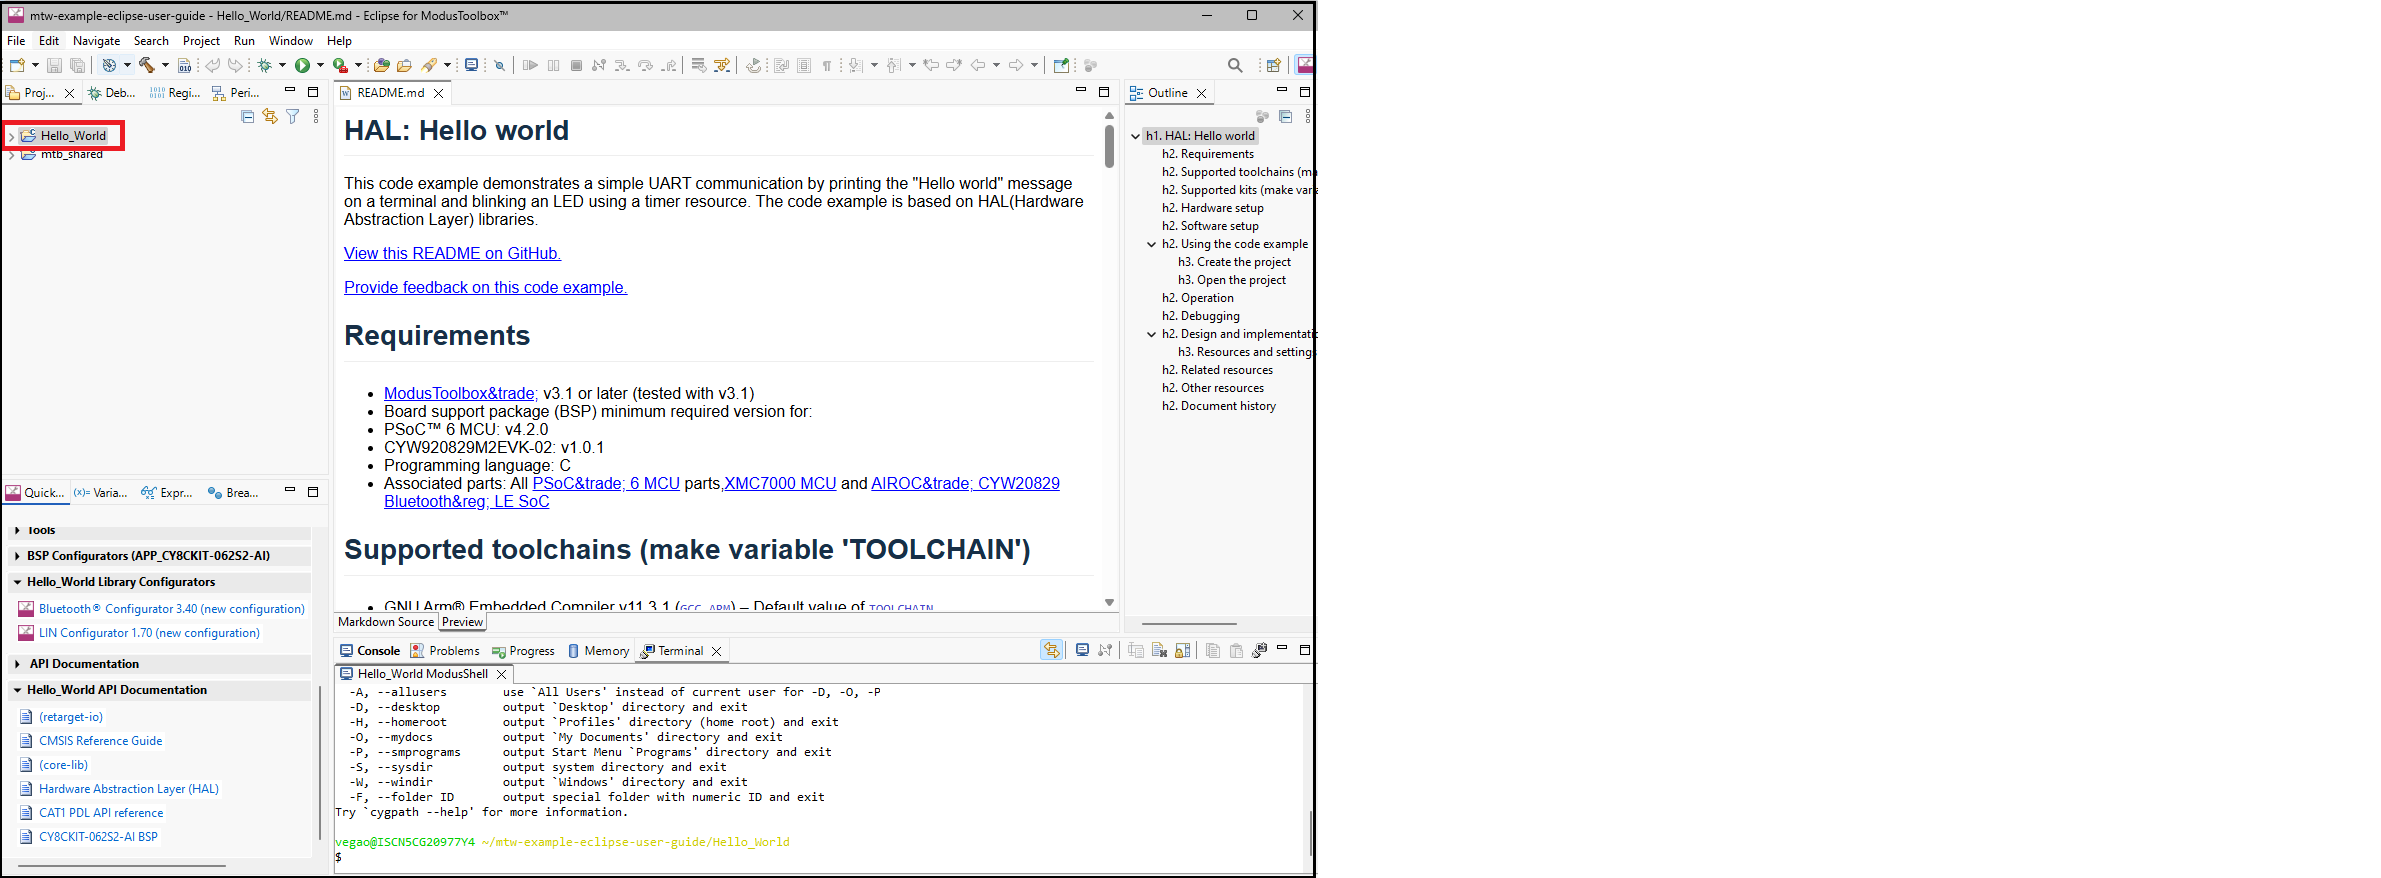
Note:
You can configure the terminal colors for the Workspace under
Window > Preferences >Terminal
.
Switch projects
When you switch projects, Eclipse creates additional tabs and automatically switches between them, so that a shell in the current project directory is always in focus. To disable this automatic switching, deselect the
Track Current Project
button in the terminal toolbar.

Specify alternate shell
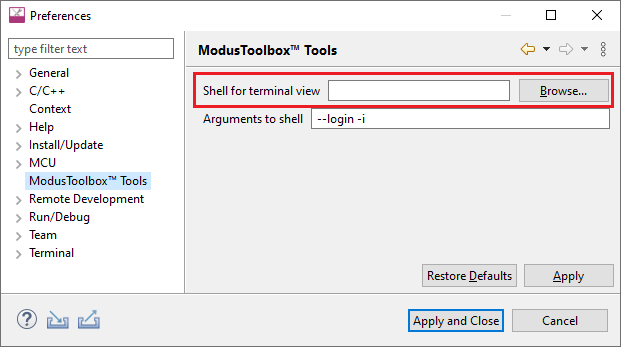
By default, the terminal uses your login shell on Linux and macOS, or the "modus-shell" Cygwin bash shell provided with your ModusToolbox™ tools installation on Windows. You can specify a different shell from
Window > Preferences > ModusToolbox™ Tools
.
Update local terminal settings
By default, the local terminal uses your User home directory as the Initial Working Directory. You can specify different options from
Window > Preferences > Local Terminal
.
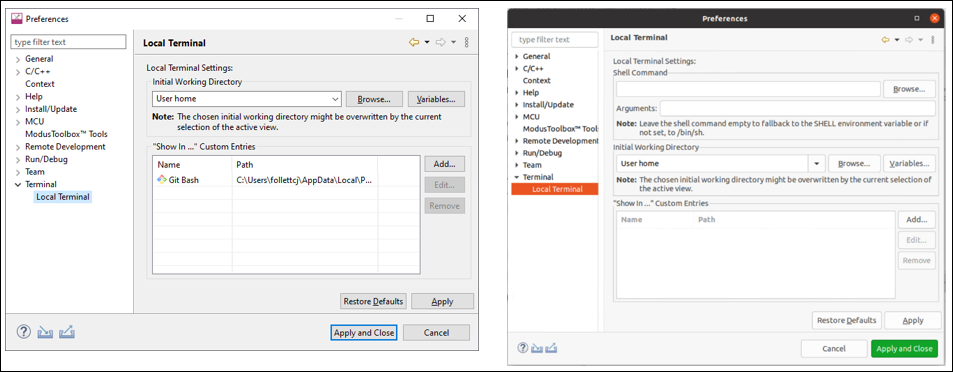
Note:
Linux and macOS include additional settings for Shell Command and Arguments.
Connect to remote machine/board
You can also connect to a remote machine or board via serial, telnet, or SSH by clicking the
Open a Terminal
button in the terminal toolbar.
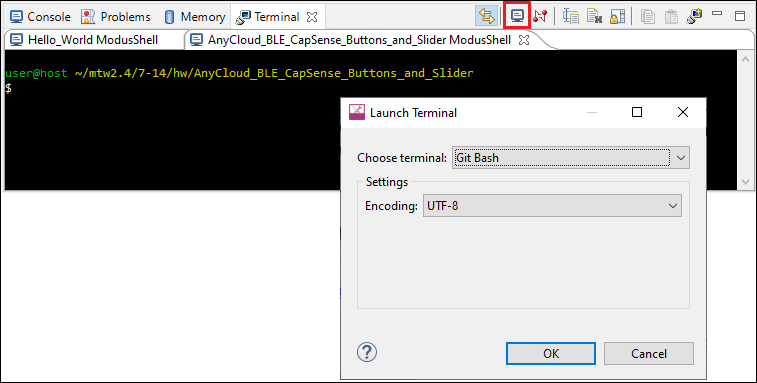
Use the
Choose terminal
pull-down menu to select the appropriate terminal.
Refresh Quick Panel
When you use tools external to Eclipse, such as the Library Manager or Device Configurator, it is likely that Eclipse will not refresh to detect changes made in those other tools. Use this link to refresh Eclipse. You may notice new documentation links or a new Active BSP in the Quick Panel as an indication that your application has new libraries and/or components.

Rename application
Single-core application
Eclipse for ModusToolbox™ software uses the standard Eclipse rename functionality. That is, right-click on the application and select
Rename
. If you use the rename feature, you will need to update your application’s launch configurations. The easiest way to do this is to use the "Generate Launches…" link in the Quick Panel.
After renaming the application, select it in the Project Explorer and notice that there is only one item under Launches. Click on the
Generate Launches for…
link. After a few moments, the generate process completes. Click on the application again in the Project Explorer and notice that all the items are shown under Launches in the Quick Panel.
Multi-core application
To rename a multi-core application, you cannot use the standard Eclipse rename functionality. Follow these steps instead:
Right-click on the affected project(s) and select
Delete
to remove from the Eclipse workspace.
On the dialog do
not
select "Delete project contents on disk". Click
OK
.

Go to the workspace location on disk and manually rename the relevant project directories.
When renaming a child project (e.g., proj_cm33_s) for a multi-core application, edit the application
Makefile
. Look for
MTB_PROJECTS=...,
and update the list with the new child project names.
Open a Terminal (modus-shell in Windows) and run
make eclipse.
Switch back to Eclipse and select
Import Existing Application In-Place
using the Quick Panel.
Restore shared directory
Various shared libraries imported from GitHub are located in a shared directory named mtb_shared (by default) adjacent to your application directories. You can delete the mtb_shared directory at any time because it can be recreated. You might do this when sharing the application, for example. The shared directory only contains files that are already controlled and versioned, so you should
not
check it into a revision control system.
When using Eclipse, if you delete the shared library directory from disk and then regenerate it, the directory will
not
be restored properly. This is because several files required by Eclipse are not restored as they were when the application was created. To resolve this issue:
Regenerate the mtb_shared directory and assorted libraries on disk using make getlibs or the Library Manager.
In Eclipse, delete the "mtb_shared" folder shown in the Project Explorer.
Note:
Do
NOT
select the check box "Delete project contents on disk" (if you do, you will have to regenerate it again).
Then, select
File > Import > C/C++ > Existing Code as Makefile Project
and click
Next >
.
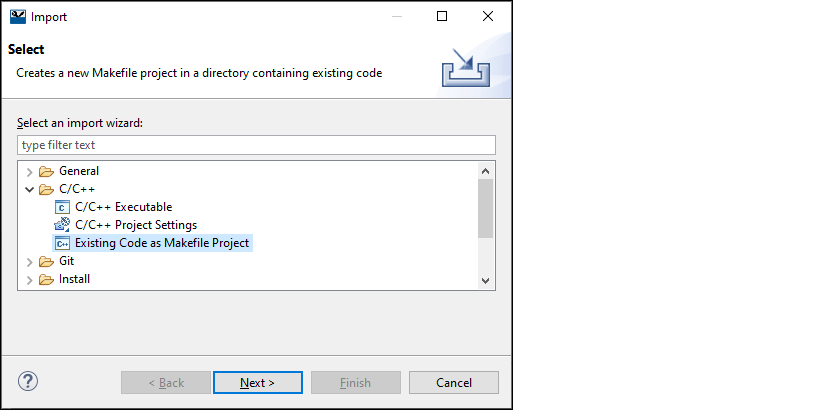
On the Import Existing Code page:
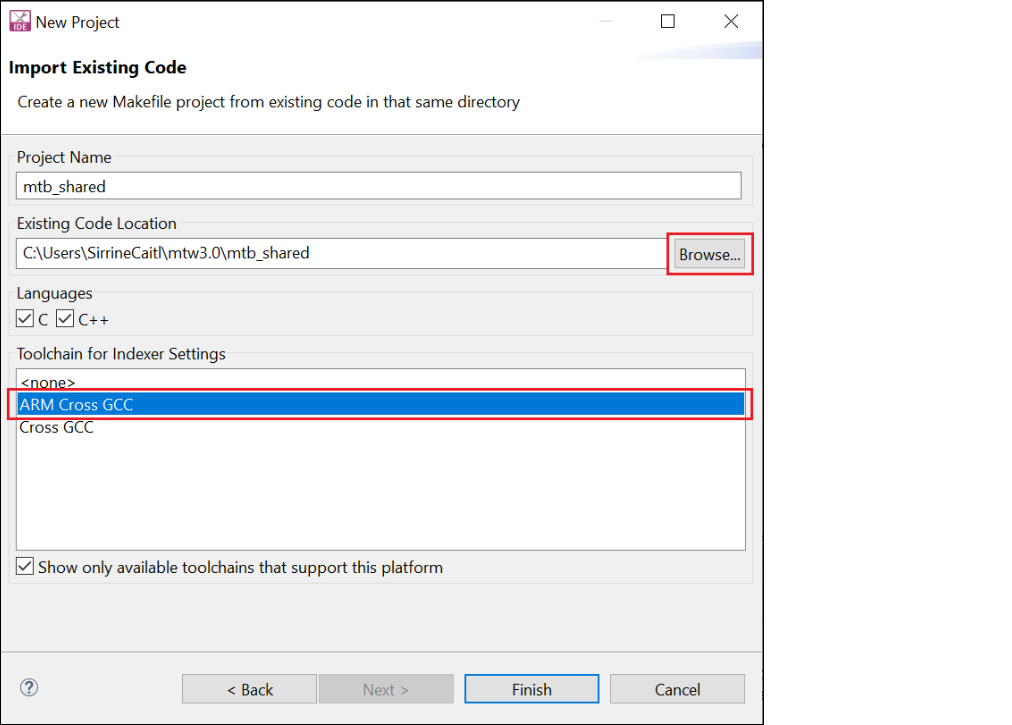
Under
Existing Code Location
, click
Browse…
, navigate to the application's root directory, select the "mtb_shared" folder, and click
Select Folder
.
Under
Toolchain for Indexer Settings
, select
ARM Cross GCC
.
Click
Finish
.
After the import completes, build the application.