Quick start
BSP Assistant use cases
The following provide different scenarios for using the BSP Assistant:
Modify BSP for existing application
: You want to experiment with changes to a BSP for an application created from a code example. Open the BSP from the application, make and save changes, and then re-build the application. Changes will only apply to the current application and not to any others.
Modify BSP without application
: You want to modify a BSP independent of an application. Open the existing BSP, make and save changes, and then you can optionally export the BSP to a zip file. Once edited and/or exported, import the BSP using the Project Creator or Library Manager. Any existing applications that reference the BSP from the saved location will see the updated BSP. These applications need to be updated through Library Manager or by running
make getlibs
to see any library changes.
Create new BSP
: You have a new piece of hardware and want to create a BSP for it. Create a new BSP, make and save changes, and then you can optionally export the BSP to a zip file. Once edited and/or exported, import the BSP using the Project Creator or Library Manager. You may also use this as a starting point to create additional BSPs using the BSP Assistant.
Basic workflow
The following is the basic workflow for using the BSP Assistant:
Launch the BSP Assistant
, and either open an existing BSP or create a new BSP.
An existing BSP may be in an application or you may browse to a location independent of an application.
Create a new BSP based on a sample board, or by specifying the devices it contains.
Edit the various areas of the BSP.
Save changes, and optionally export the BSP.
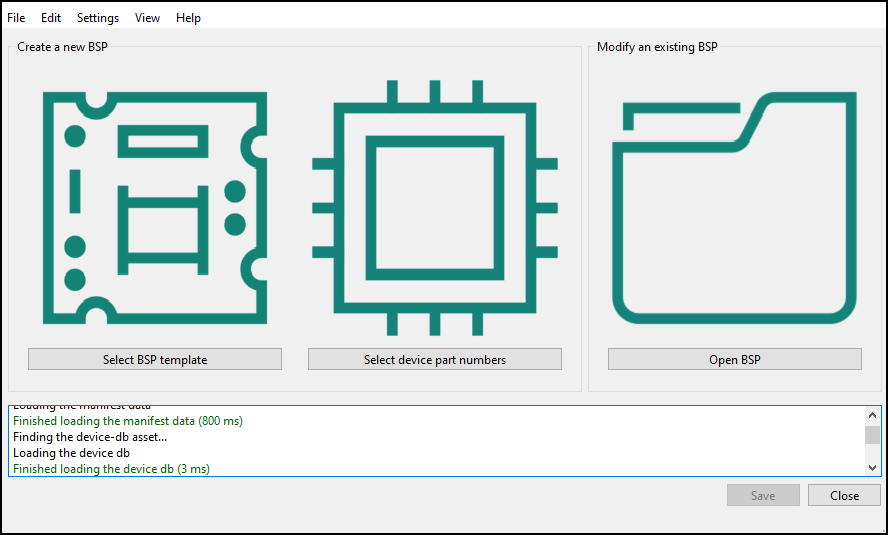
Opening existing BSP
On the main BSP Assistant window, click the
Open BSP
link or select
File > Open
to access the standard Open dialog. Then, navigate to the directory that contains the desired BSP, and click
Select Folder
.

Note:
If the specified BSP has a .git directory that points to an Infineon repository, a warning dialog will indicate that you might want to use the New... dialog to import this BSP into a new location that is not connected to Infineon's Git repositories before customizing it.
Creating new BSP based on template
On the main BSP Assistant window, click the
Select BSP Template
link or select
File > New > From BSP Template
to open the Create New BSP from Template dialog.
This dialog is similar to the ModusToolbox™ Project Creator tool in that it provides a list of BSPs for Infineon kits and generic devices. Refer to the
Project Creator user guide
for more details about that tool.
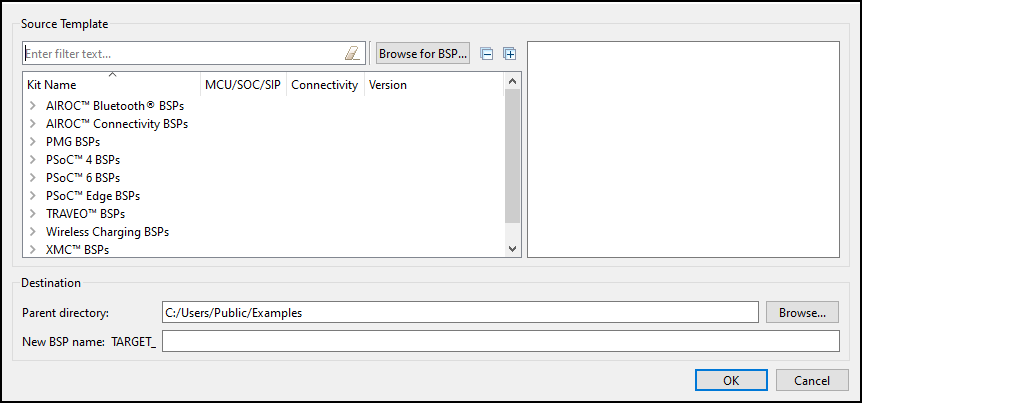
Select a BSP that closely matches what you intend to use for your design.
Alternatively, click
Browse for BSP
in the Source Template section and then navigate to and select the BSP you wish to import.
Enter the
Parent directory
location, or click
Browse
in the Destination section and navigate to the location where the BSP will be saved.
Type a name for the BSP in the
New BSP name
field and click
OK
.
Note:
To prevent copy-and-paste errors, an error message displays if you enter "TARGET_" in the field so that you do not mistakenly enter "TARGET_TARGET_".
Creating a new BSP by specifying devices
On the main BSP Assistant window, click the
Select device part numbers
link or select
File > New > From Device Part Numbers
to open the Create New BSP from Contained MPNs dialog.
This dialog provides a list of all devices by family category, as well as various companion devices.
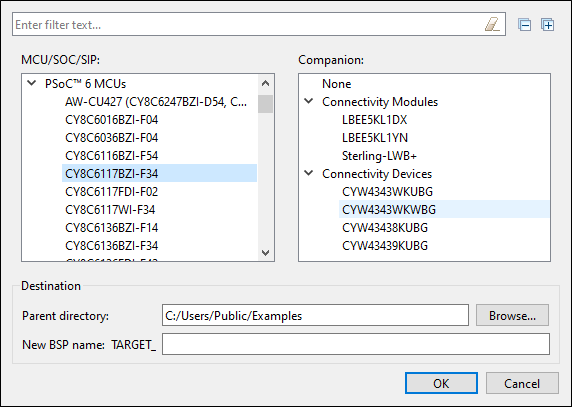
On the left, select the MCU/SOC/SIP for your BSP. You can use the filter option to limit the number of devices displayed.
On the right, after selecting an MCU/SOC/SIP, select the appropriate companion device (or none).
Note:
We recommend when adding a companion device that you add a connectivity module instead of a connectivity device; seeConnectivity modulefor more details.
Enter the
Parent directory
location, or click
Browse
in the Destination section and navigate to the location where the BSP will be saved.
Type a name for the BSP in the
New BSP name
field and click
OK
.
Note:
To prevent copy-and-paste errors, an error message displays if you enter "TARGET_" in the field so that you do not mistakenly enter "TARGET_TARGET_".