The Place menu of a schematics tab lets you put components and other elements into a schematic.
(For information on the Place menu in symbol tabs, see Place menu (symbol tab).)
Choosing a command from the menu turns the mouse pointer into a representation of the corresponding component. Clicking the mouse in the schematic places the component in that location. You can continue clicking to place additional components of the selected type. To stop placing this type of component, choose another command from the Place menu or press the Escape key.
The Wire Name and Text commands work in the same way but first open the Wire Name and Place Text dialog, respectively.
The Line and Rectangle commands work similar to component-placing commands but require two clicks (for the start end the end of the shape) for each placed element.
- Select
-
Switches to the select tool, which lets you select components in the schematic.
- Ground
-
Lets you place grounds in the schematic.
Choose a different command from the Place menu or press the Escape key to stop placing grounds.
- Resistor (EU)
-
Lets you place resistors in the schematic using a symbol that is common in the EU.
Choose a different command from the Place menu or press the Escape key to stop placing grounds.
- Resistor (US)
-
Lets you place grounds in the schematic using a symbol that is common in the US.
Choose a different command from the Place menu or press the Escape key to stop placing grounds.
- Capacitor
-
Lets you place capacitors in the schematic.
Choose a different command from the Place menu or press the Escape key to stop placing grounds.
- Inductor
-
Lets you place inductors in the schematic.
Choose a different command from the Place menu or press the Escape key to stop placing grounds.
- Current Source (DC)
-
Lets you place DC current sources in the schematic.
Choose a different command from the Place menu or press the Escape key to stop placing grounds.
- Voltage Source (DC)
-
Lets you place DC voltage sources in the schematic.
Choose a different command from the Place menu or press the Escape key to stop placing grounds.
- Diode
-
Lets you place diodes in the schematic.
Choose a different command from the Place menu or press the Escape key to stop placing grounds.
- Wire (Narrow)
-
Lets you place narrow wires in the schematic.
Choose a different command from the Place menu or press the Escape key to stop placing grounds.
- Wire (Wide)
-
Lets you place wide wires in the schematic.
Choose a different command from the Place menu or press the Escape key to stop placing grounds.
- Wire Name
-
Lets you name wires in the schematic.
Choosing the command opens the Wire Name dialog:
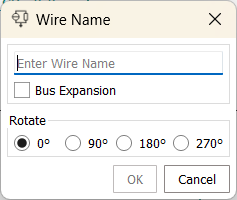
- Enter Wire Name
-
The name that you want to give the wire.
- Bus Expansion
-
- Rotate
-
The orientation of the text in the schematic graphic.
- OK
-
Clicking OK closes the dialog and turns the mouse pointer into a representation of the wire name. Clicking a wire applies the name to it.
Choose a different command from the Place menu or press the Escape key to stop naming wires.
- Cancel
-
Clicking Cancel closes the dialog and chooses the select tool (as if you had chosen Select from the Place menu).
- Solder Dot
-
Lets you place solder dots in the schematic.
Choose a different command from the Place menu or press the Escape key to stop placing solder dots.
- Line
-
Lets you place lines in the schematic. Click once for placing the start of the line, and click again to place the end.
Choose a different command from the Place menu or press the Escape key to stop placing lines.
- Rectangle
-
Lets you place rectangles in the schematic. Click once for placing one corner of the rectangle, and click again to place the diagonally opposite corner.
Choose a different command from the Place menu or press the Escape key to stop placing grounds.
- Text
-
Lets you place text in the schematic.
Choosing the command opens the Place Text dialog.
Choose a different command from the Place menu or press the Escape key to stop placing grounds.