Program/debug using KitProg3/MiniProg4
Most PSOC™-based kits use KitProg3/MiniProg4 as the default programmer/debugger, so there is nothing to configure for them.
Connect the Kit
Follow the instructions provided with the kit to connect it to the computer with the USB cable.
KitProg Firmware Loader
The PSOC™ MCU kits include on-board programmer/debug firmware, called KitProg. KitProg3 is the latest firmware version. However, some older kits come with KitProg2 firmware installed, which does not work with the ModusToolbox™ software and you must update them to KitProg3. KitProg3 provides the CMSIS-DAP (Bulk) protocol by default, which is up to ~2.5 times faster than the CMSIS-DAP (HID) protocol. Both modes can be used via OpenOCD.
To update it, use the ModusToolbox™ Programmer GUI or the fw-loader CLI tool. Both are provided with the ModusToolbox™ Programming tools package available from the
Setup program
.
For more details about these tools, refer to the
ModusToolbox™ Programmer GUI user guide
or the
Firmware Loader user guide
.
Note:
On a Linux machine, you must run the udev_rules\install_rules.sh script before the first run of the fw-loader.
Supplying power with KitProg3_MiniProg4
If using the KitProg3 connector on a kit, power is generally supplied by the host PC. When using a MiniProg4, power is not supplied via the MiniProg4 by default. It is expected that the target MCU will be powered externally. However, the MiniProg4 does provide the ability to supply power to the target MCU.
Note:
Verify the voltage range supported by the target MCU, since it can be damaged by supplying unsupported voltage. Make sure that your MCU is not powered externally before supplying power via the KitProg3_MiniProg4 launch configuration. This supply is limited to approximately 200 mA and is protected against excess current draw. You can select 1.8 V, 2.5 V, 3.3 V, or 5 V.
Turning power supply on
Debug session
To turn power supply on during a debug session, edit the Launch configurations:
Open the Run and Debug view, select the launch configuration to be modified, and click the gear icon that opens the selected launch configurations in launch.json file.

Look for the
openOCDPreConfigLaunchCommands
property. If it is not present, add it. Update the property to include the following value:
"set ENABLE_POWER_SUPPLY <mV>"Where
<mV>
defines target voltage in millivolts. For example:
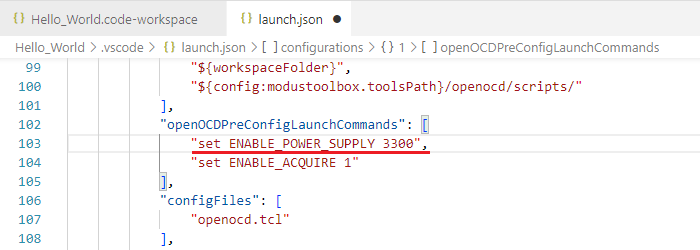
Save the changes to the file.
Programing or erasing
To turn power supply on when programing or erasing, edit the Task configurations:
On the main menu, select
Terminal > Configure Task...
.
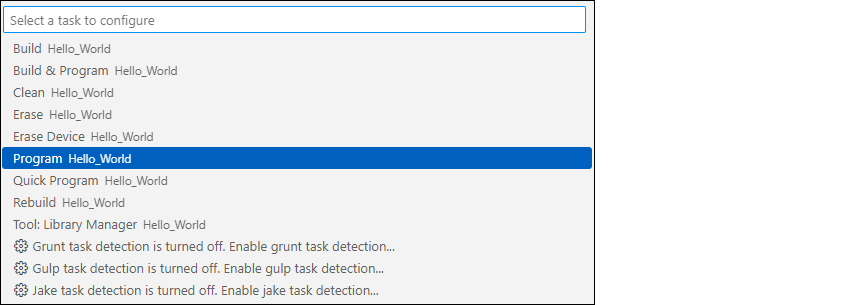
On the dialog, select the task to be modified, which opens the
tasks.json
file to that task.
Update the task to add the following value to the
args
property:
_MTB_RECIPE__OPENOCD_INTERFACE=\"source [find interface/kitprog3.cfg]; set ENABLE_POWER_SUPPLY <mV>";\Where
<mV>
defines target voltage in millivolts. For example:
{
    "label": "Program",
            "type": "process",
    "command": "bash",
    "args": [
        "--norc",
        "-c",
        "make -j8 program _MTB_RECIPE__OPENOCD_INTERFACE=\"source [find interface/kitprog3.cfg]; set ENABLE_POWER_SUPPLY 3300";\ --output-sync"
    ],
    "windows": {
        "command": "${config:modustoolbox.toolsPath}/modus-shell/bin/bash.exe",
        "args": [
            "--norc",
            "-c",
            "export PATH=/bin:/usr/bin:$PATH ; ${config:modustoolbox.toolsPath}/modus-shell/bin/make.exe -j8 program _MTB_RECIPE__OPENOCD_INTERFACE=\"source [find interface/kitprog3.cfg]; set ENABLE_POWER_SUPPLY 3300";\ --output-sync"
        ]
    },
    "problemMatcher": "$gcc",
    "group": {
        "kind": "build"
    }
},
Save the changes to the file.
Power cycle programming mode with KitProg3_MiniProg4
Note:
This section is applicable to PSOC™ 6 and PSOC™ 4 only.
By default, Launch Configurations use Reset mode to program the device. However, Reset mode is not available in all situations (for example, if the XRES pin is not available on the part's package). In these cases, Launch Configurations use an alternative reset with software. However, using the software reset type is not sufficient in cases in which access to the device's DAP is restricted (such as when set by security settings).
If there is no XRES pin available and DAP access is restricted, the only way to reset a part is to use Power Cycle mode. Follow these instructions to add commands to the launch configuration and switch to Power Cycle mode.
Note:
Verify the voltage range supported by the target MCU, since it can be damaged by supplying unsupported voltage. Make sure that your MCU is not powered externally before supplying power via the KitProg3_MiniProg4.
Debug session
To enable power cycle during a debug session, edit the Launch configurations:
Open the
Run and Debug
view, select the launch configuration to be modified, and click the gear icon that opens the selected launch configuration in the
launch.json
file.
Look for the
openOCDPreConfigLaunchCommands
property. If it is not present, add it. Update the property to include the following value:
For PSOC™ 6:
"set ENABLE_POWER_SUPPLY <mV>",
"set ENABLE_ACQUIRE 2"
For PSOC™ 4:
"set ENABLE_POWER_SUPPLY <mV>",
"set PSOC4_USE_ACQUIRE 2"
Where
<mV>
defines target voltage in millivolts. For example:
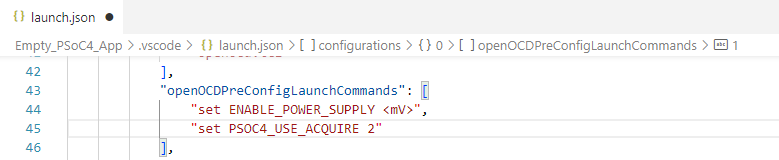
Save the changes to the file.
Programing or erasing
To enable power cycle when programing or erasing, edit the Task configurations:
On the main menu, select
Terminal > Configure Task...
.
On the dialog, select the task to be modified, which opens the
tasks.json
file to that task.
Update the task to add the following value to the
args
property:
For PSOC™ 6:
_MTB_RECIPE__OPENOCD_INTERFACE=\"source [find interface/kitprog3.cfg]; set ENABLE_POWER_SUPPLY <mV>; set ENABLE_ACQUIRE 2;\"For PSOC™ 4:
_MTB_RECIPE__OPENOCD_INTERFACE=\"source [find interface/kitprog3.cfg]; set ENABLE_POWER_SUPPLY <mV>; set PSOC4_USE_ACQUIRE 2;\"
Where
<mV>
defines target voltage in millivolts. For example:
Save the changes to the file.