Make application changes and re-export
After you have successfully built the application and programmed the device, you may wish to make changes, such as configuring hardware settings for the BSP and the device, as well as adding and updating libraries. To do that, you will need to open a specific ModusToolbox™ tool or configurator, make appropriate hardware or library changes, and then re-export to update the application.
Configure hardware
Configuring hardware involves using the BSP Assistant tool to change the device and/or configurations. We recommend that you back up your project files first. Then, open the Library Manager using one of the methods described in Opening ModusToolbox™ tools and configurators. Refer to the BSP Assistant user guide for all the details about how to use this tool.
If you just want to modify parts of the existing device such as peripherals, ports/pins, clocks, etc., you can open the Device Configurator from the BSP Assistant, or as described in Opening ModusToolbox™ tools and configurators. For more details about that tool, refer to the Device Configurator user guide.
Add/update libraries
Another way to make changes to your application is by adding and updating various libraries. You do this with the Library Manager. We recommend that you back up your project files first. Then, open the Library Manager using one of the methods described in Opening ModusToolbox™ tools and configurators. For more details about the Library Manager, refer to the user guide.
Opening ModusToolbox tools and configurators
When working with a ModusToolbox™ application in Keil µVision, it is not as convenient to open various tools and configurators as it is using Eclipse or Visual Studio Code. Those IDEs have customized plug-ins or extensions that provide a more integrated experience. Still, there are some ways to open various ModusToolbox™ tools for use with Keil µVision. Here are a few of them:
Configuring Keil µVision
One option to open ModusToolbox™ tools is to configure the Keil µVision Tools menu using the Customize Tools Menu dialog to add shortcuts to the various tools. This is a one-time configuration for each tool you wish to add. Then, the tools will be available for all your ModusToolbox™ applications running in Keil µVision.
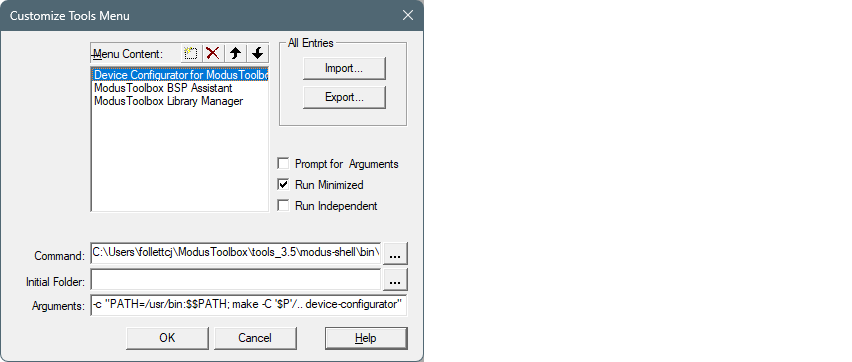
On this dialog, click the Menu Content "New" button and enter a name for the tool. Then, complete the following:
-
Command :
[path-to-modustoolbox-tools]\modus-shell\bin\bash.exeThis opens the bash shell from the tools package installation location. You can navigate to the executable using the […] button.
-
Arguments :
-c "PATH=/usr/bin:$$PATH; make -C '$P' [tool-name]"This passes a command to the bash shell to open the specified
[tool-name](for example, device-configurator, bsp-assistant, library-manager, etc.).The variable
'$P'is the µVision project directory, and it is quoted because it returns a Windows-style path, which does not work without the quotes in bash. If the application is multi-core, add/..to navigate to one directory higher where the Makefile is located. -
Run Minimized : This check box is optional. If selected, the bash shell is minimized in the Taskbar running the command to open the tool.
For more details about this dialog, refer to the Keil µVision user guide/help.
Using modus-shell
Another way to open tools and configurators and update the application is to use the modus-shell bash terminal. Open this tool from the installation directory or by typing "modus-shell" in the Windows Search box.
As described in the ModusToolbox™ tools package user guide "ModusToolbox™ build system'' chapter, you can run numerous make commands in the application directory. These include launching tools and configurators. In the modus-shell terminal, navigate to the application or project directory containing the Makefile, and run amake [tool-name]command. For example:
cd mtw/example/Hello_World

make library-manager
For consistency, the[tool-name]is always the name of the tool file name on disk, such as library-manager, bsp-assistant, device-configurator, etc. You can view tool/configurator names by using themake helpcommand.
When you open tools and configurators this way, they are opened in context with your application.
Opening directly
Another way to open any ModusToolbox™ tool or configurator is directly by launching it from the installation directory, under tools_[version]. On Windows, you can also use the Search box and type the name of the tool. After the tool opens, you will have to find the configuration file or project directory from the tool to use it with your application. Each tool and configurator includes a user guide for how to do this.
Re-export to update application
After running a tool or configurator to make some change, you will need to update the application in Keil µVision using themake uvisioncommand with the modus-shell terminal.
It's very important to pay attention to the name of your cprj file(s). The name is always the one you specified when creating the project. However, if you exported from another IDE without using theCY_IDE_PRJNAMEvariable, the name will come from the project Makefile, which might be different than the cprj file name..
The basic command is as follows:
make uvision CY_IDE_PRJNAME=[existing-cprj-name] TOOLCHAIN=ARM
After running the command, verify the cprj file(s) is(are) updated, and then double-click to overwrite the uprojx file(s). When you view the project in Keil µVision, you will see the updated file structure.