Configure and build the application
Configure applications with C++ files
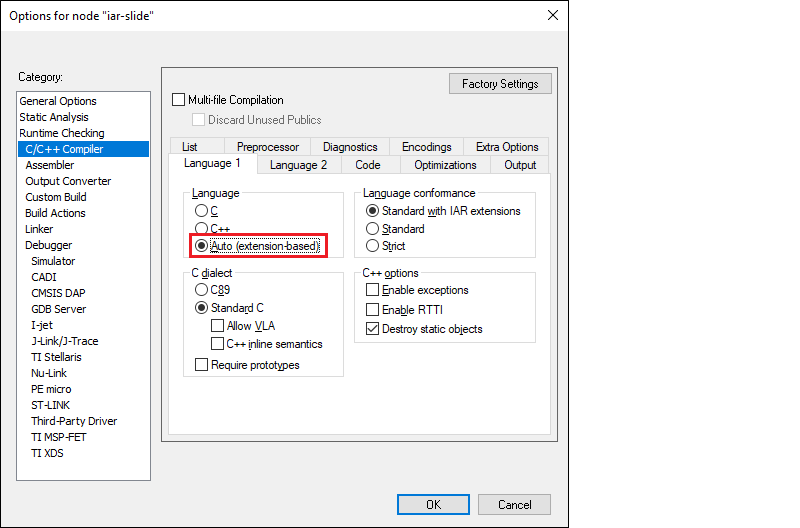
In cases where your application includes C++ files, you need to configure the C/C++ Compiler option. Right-click on the project and select
Options > C/C++ Compiler > Language 1
, select
Auto (extension-based)
, and click
OK
.
Build options, and prebuild/postbuild settings
To set various build options, use the sections on the IAR Embedded Workbench Project Options dialog where you can enter command-line options:
C / C++ Compiler > Extra Options
Assembler > Extra Options
Linker > Extra Options
Prebuild and postbuild steps from a ModusToolbox application are not included in the export process by default. If your original application has these steps, you must include them in the IAR Embedded Workbench manually as follows:
On the Project Options dialog, select the
Build Actions
category.
Click the
New
button to open the New Build Action dialog.
On the New Build Action dialog, enter a command-line argument, output and/or input files, the working directory, and the build order.
Click
OK
.
Refer to the IAR Embedded Workbench Help for more details.
RTOS settings
If your application includes an RTOS, you will need to update compiler and linker settings in IAR Embedded Workbench. This is needed to make the C/C++ library implementation thread safe. This process is described in the
IAR C/C++ Development Guide
Open
Project > Options > General Options > Library Configuration
.
In the
Library
menu, select "Full".
Select the
Enable thread support in library
check box.
Click
OK
.
Once enabled, this will require implementations of functions that perform the locking that are provided by the clib-support library that we provide.
https://github.com/Infineon/clib-support/blob/master/README.md
Note:
This is not specific to Infineon devices but more about how the IAR compiler/linker and C library implementation work. All compilers have similar enabling needed
Build the application
When you have made all the necessary configuration changes, you can build the application.
Note:
For applications using these device skip the next step. Instead, perform the steps outlined in the applicable section:
PSOC™ 64 MCU (
PSOC™ 64 application configuration
)
AIROC™ CYW20829 device (
AIROC™ CYW20829 device configuration
)
PSOC™ Control C3 device (
PSOC™ Control C3 device configuration
)
On the IAR Embedded Workbench main menu, select
Project > Make
.
PSOC™ 64 application configuration
Before building an application for a PSOC™ 64 secure MCU in IAR, you must perform the following configuration steps.
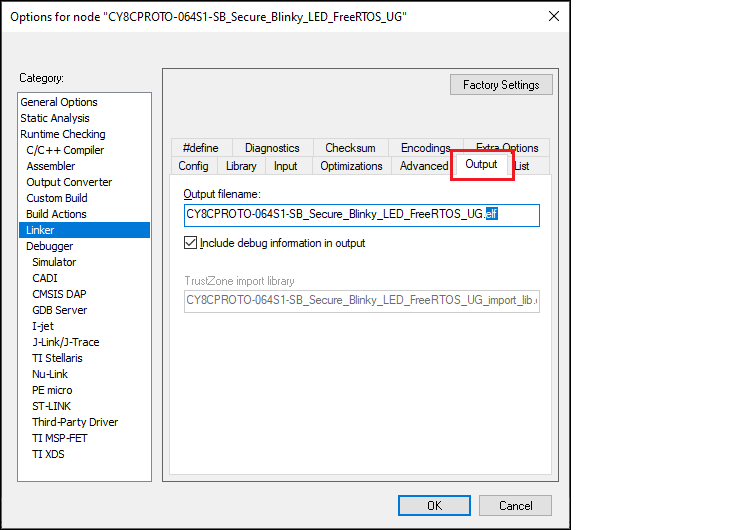
Select
Project > Options > Linker > Output
and change file extension from ".out" to ".elf" in
Output filename
field:
Click
OK
to close the dialog.
Build the application using the ModusToolbox™
make build
command.
You can do this by using a Terminal or exporting the application to Eclipse or VS Code.
Copy the post-build command from the log. For example:
<path-to-python>/python.exe C:/UG/CY8CPROTO-064S1-SB_Secure_Blinky_LED_FreeRTOS_UG/bsps/TARGET_APP_CY8CPROTO-064S1-SB/psoc64_postbuild.py --core CM4 --secure-boot-stage single --policy policy_single_CM0_CM4 --target cyb06xx7 --toolchain-path C:/Infineon/Tools/ModusToolbox/tools_<version>/gcc --toolchain GCC_ARM --build-dir C:/UG/CY8CPROTO-064S1-SB_Secure_Blinky_LED_FreeRTOS_UG/build/APP_CY8CPROTO-064S1-SB/Debug --app-name mtb-example-psoc6-secure-blinkyled-freertos --cm0-app-path ../mtb_shared/cat1cm0p/release-v1.0.0/COMPONENT_CAT1A/COMPONENT_CM0P_SECURE --cm0-app-name psoc6_01_cm0p_securePaste the command into an appropriate editor, and make the following edits:
Add path to the policy file e.g.:
--policy-path ../policy
Change
--build-dir
parameter to
Exe
Change
--app-name
to you project in IAR name
Example of command after edit:
<path-to-python>/python.exe C:/UG/CY8CPROTO-064S1-SB_Secure_Blinky_LED_FreeRTOS_UG/bsps/TARGET_APP_CY8CPROTO-064S1-SB/psoc64_postbuild.py --core CM4 --secure-boot-stage single --policy-path ../policy --policy policy_single_CM0_CM4 --target cyb06xx7 --toolchain-path C:/Infineon/Tools/ModusToolbox/tools_<version>/gcc --toolchain GCC_ARM --build-dir Exe --app-name CY8CPROTO-064S1-SB_Secure_Blinky_LED_FreeRTOS_UG --cm0-app-path ../mtb_shared/cat1cm0p/release-v1.0.0/COMPONENT_CAT1A/COMPONENT_CM0P_SECURE --cm0-app-name psoc6_01_cm0p_secureCopy the edited command.
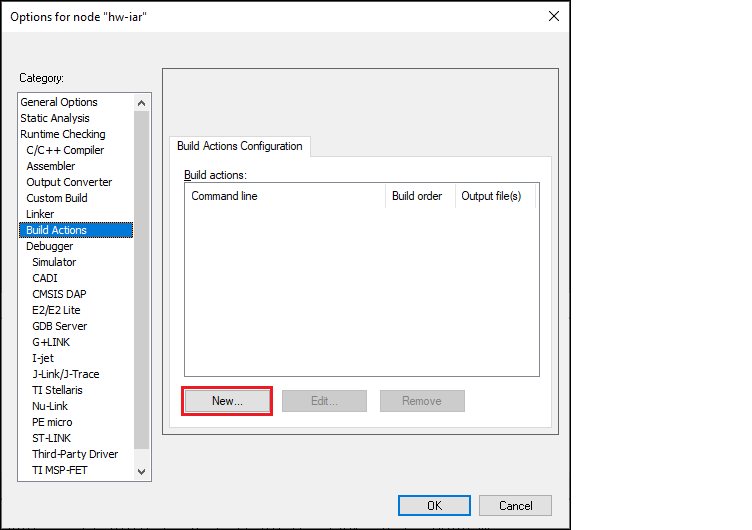
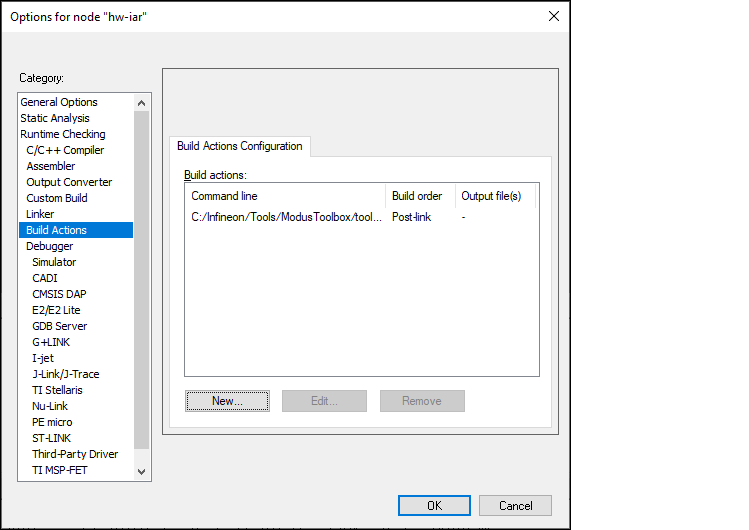
In IAR, select
Project > Options > Build Actions
and click
New
:
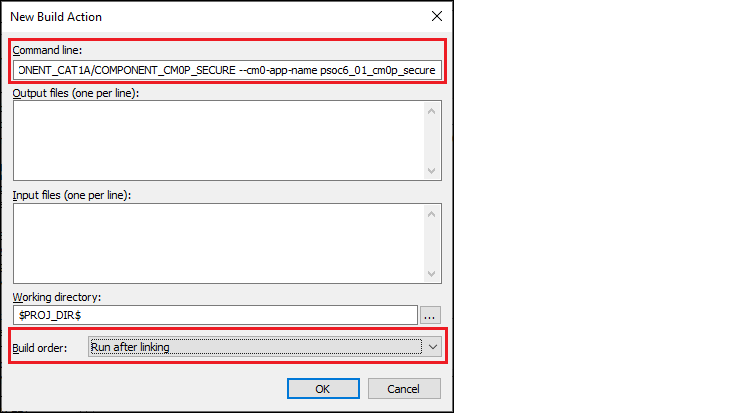
On the New Build Action dialog, paste the edited command in the
Command line
field, select "Run after linking" in the
Build order
field, and click
OK
:
Click
OK
to close the dialog.
On the IAR main menu, select
Project > Make
to build the application.
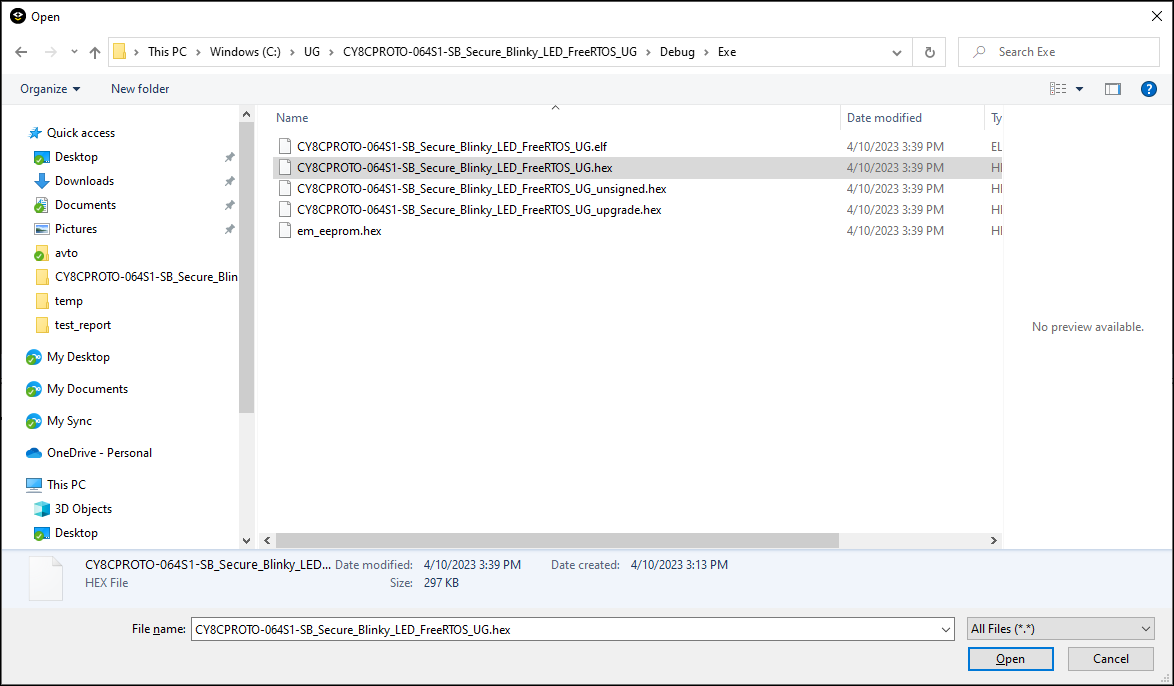
Select
Project > Download > Download file…
and select the
<project_name>.hex
file in
<project_root >\Debug\Exe
.
Select
Project > Debug without Downloading
.
AIROC™ CYW20829 device configuration
Before building an application for an AIROC™ CYW20829 device in IAR Embedded Workbench, you must perform the following configuration steps:
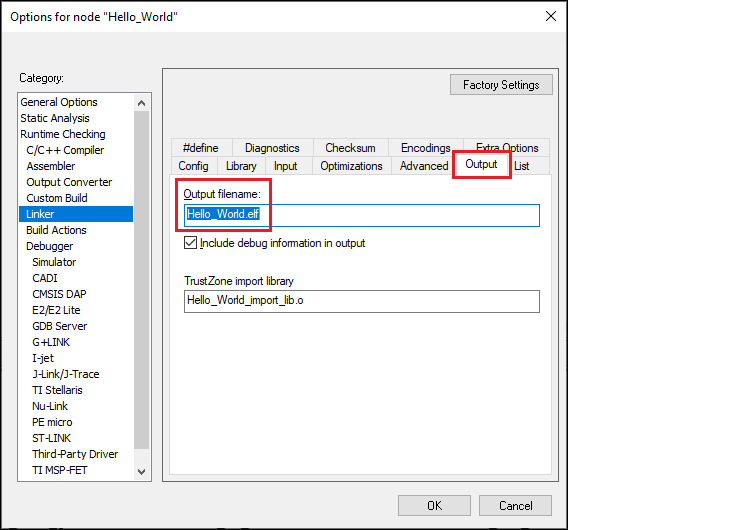
Select
Project > Options > Linker > Output
and change the file extension from ".out" to ".elf" in the
Output filename
field:
Create a
postbuild.bat
file in root directory of the project.
Add
SET PATH=%PATH%;"/usr/bin"
at the start of file.
Build the application using the ModusToolbox™
make build
command. For example:
make build -j8 TOOLCHAIN=IARYou can do this by using a Terminal or exporting the application to Eclipse or VS Code.
Copy the post-build output from the log. For example:
"C:/Program Files/IAR Systems/Embedded Workbench 9.2/arm/bin/ielftool" C:/Users/Public/mtw3.2/20829-eclipse/Hello_World/build/APP_CYW920829M2EVK-02/Debug/mtb-example-hal-hello-world.elf --bin-multi C:/Users/Public/mtw3.2/20829-eclipse/Hello_World/build/APP_CYW920829M2EVK-02/Debug/mtb-example-hal-hello-world.bin; "C:/Program Files/IAR Systems/Embedded Workbench 9.2/arm/bin/ielfdumparm"  -a C:/Users/Public/mtw3.2/20829-eclipse/Hello_World/build/APP_CYW920829M2EVK-02/Debug/mtb-example-hal-hello-world.elf> C:/Users/Public/mtw3.2/20829-eclipse/Hello_World/build/APP_CYW920829M2EVK-02/Debug/mtb-example-hal-hello-world.dis; "C:/Users/Public/ModusToolbox/tools_<version>/modus-shell/bin/bash.exe" --norc --noprofile ../mtb_shared/recipe-make-cat1b/release-v2.2.1/make/scripts/20829/flash_postbuild.sh "IAR" "C:/Users/Public/mtw3.2/20829-eclipse/Hello_World/build/APP_CYW920829M2EVK-02/Debug" "mtb-example-hal-hello-world" "C:/Users/Public/ModusToolbox/tools_<version>/gcc/bin" "C:/Users/Public/ModusToolbox/tools_<version>/srecord/bin/srec_cat.exe" "0x00003A00"; "C:/Users/Public/ModusToolbox/tools_<version>/modus-shell/bin/bash.exe" --norc --noprofile ../mtb_shared/recipe-make-cat1b/release-v2.2.1/make/scripts/20829/run_toc2_generator.sh "NORMAL_NO_SECURE" "C:/Users/Public/mtw3.2/20829-eclipse/Hello_World/build/APP_CYW920829M2EVK-02/Debug" "mtb-example-hal-hello-world" "flash" "bsps/TARGET_APP_CYW920829M2EVK-02" "NONE" "C:/Users/Public/ModusToolbox/tools_<version>/gcc" "" 0x20000 0 "" "0x00003A00" "256";
C:/Users/Public/ModusToolbox/tools_<version>/srecord/bin/srec_cat.exe C:/Users/Public/mtw3.2/20829-eclipse/Hello_World/build/APP_CYW920829M2EVK-02/Debug/mtb-example-hal-hello-world.final.bin -Binary -offset 0x60000000 -o C:/Users/Public/mtw3.2/20829-eclipse/Hello_World/build/APP_CYW920829M2EVK-02/Debug/mtb-example-hal-hello-world.final.hex -Intel -Output_Block_Size=16; rm -rf C:/Users/Public/mtw3.2/20829-eclipse/Hello_World/build/APP_CYW920829M2EVK-02/Debug/mtb-example-hal-hello-world.bin;
Paste the post-build output into the
postbuild.bat
file, and make the following edits:
Change the path and names of files from "build/APP…" to "Debug/Exe/…".
Remove the semi-colons.
Delete un-needed commands (e.g., ielfdumparm, rm -rf).
Example edited file:
SET PATH=%PATH%;"/usr/bin"
"C:/Program Files/IAR Systems/Embedded Workbench 9.2/arm/bin/ielftool" C:/Users/Public/20829_iar_secure/Hello_World/Debug/Exe/Hello_World.elf --bin-multi C:/Users/Public/20829_iar_secure/Hello_World/Debug/Exe/Hello_World.bin
"C:/Users/Public/ModusToolbox/tools_<version>/modus-shell/bin/bash.exe" --norc --noprofile ../mtb_shared/recipe-make-cat1b/release-v2.2.1/make/scripts/20829/flash_postbuild.sh "IAR" "C:/Users/Public/20829_iar_secure/Hello_World/Debug/Exe" "Hello_World" "C:/Users/Public/ModusToolbox/tools_<version>/gcc/bin" "C:/Users/Public/ModusToolbox/tools_<version>/srecord/bin/srec_cat.exe" "0x00003A00" "C:/Users/Public/ModusToolbox/tools_<version>/modus-shell/bin/bash.exe" --norc --noprofile ../mtb_shared/recipe-make-cat1b/release-v2.2.1/make/scripts/20829/run_toc2_generator.sh "NORMAL_NO_SECURE" "C:/Users/Public/20829_iar_secure/Hello_World/Debug/Exe" "Hello_World" "flash" "bsps/TARGET_APP_CYW920829M2EVK-02" "NONE" "C:/Users/Public/ModusToolbox/tools_<version>/gcc" "" 0x20000 0 "" "0x00003A00" "256"
C:/Users/Public/ModusToolbox/tools_<version>/srecord/bin/srec_cat.exe "Debug/Exe/Hello_World.final.bin" -Binary -offset 0x60000000 -o "Debug/Exe/Hello_World.final.hex" -Intel -Output_Block_Size=16
In IAR, select
Project > Options > Build Actions
and click
New
:

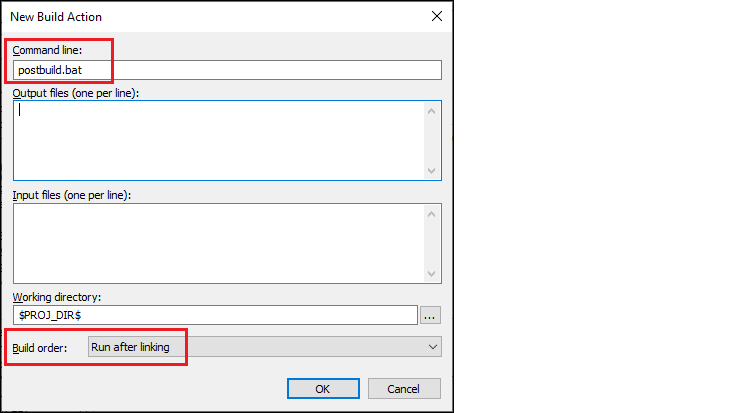
On the New Build Action dialog, type the
postbuild.bat
file in the
Command line
field, select "Run after linking" in the
Build order
field, and click
OK
:
Click
OK
to close the New Build Action dialog.
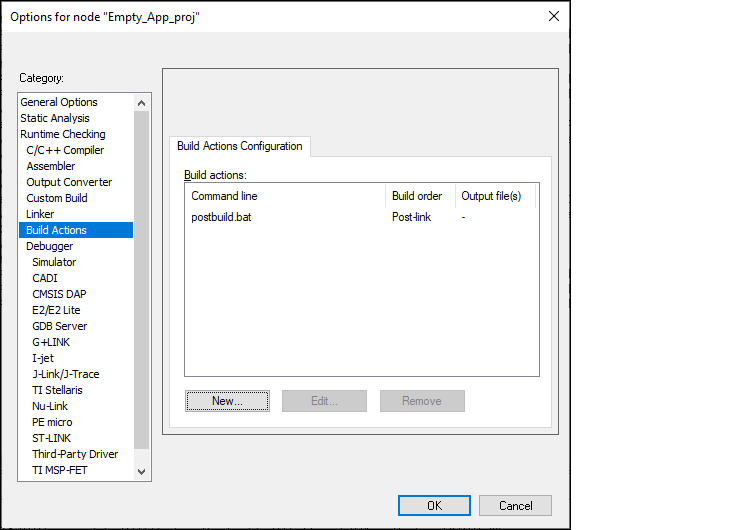
Click
OK
to close the Options dialog.
On the IAR main menu, select
Project > Make
to build the application.
C:\Users\Public\20829_iar_secure\Hello_World>C:/Users/Public/ModusToolbox/tools_3.2/srecord/bin/srec_cat.exe "Debug/Exe/Hello_World.final.bin" -Binary -offset 0x60000000 -o "Debug/Exe/Hello_World.final.hex" -Intel -Output_Block_Size=16
Total number of errors: 0
Total number of warnings: 0
Resolving dependencies...
Using C:\Program Files\IAR Systems\Embedded Workbench 9.2\common\bin\ninja.exe for the build
Build succeeded
Select
Project > Download > Download file…
and select the
<project_name>.final.hex
file in
<project_root>\Debug\Exe
[you might have to switch to All Files (.)].
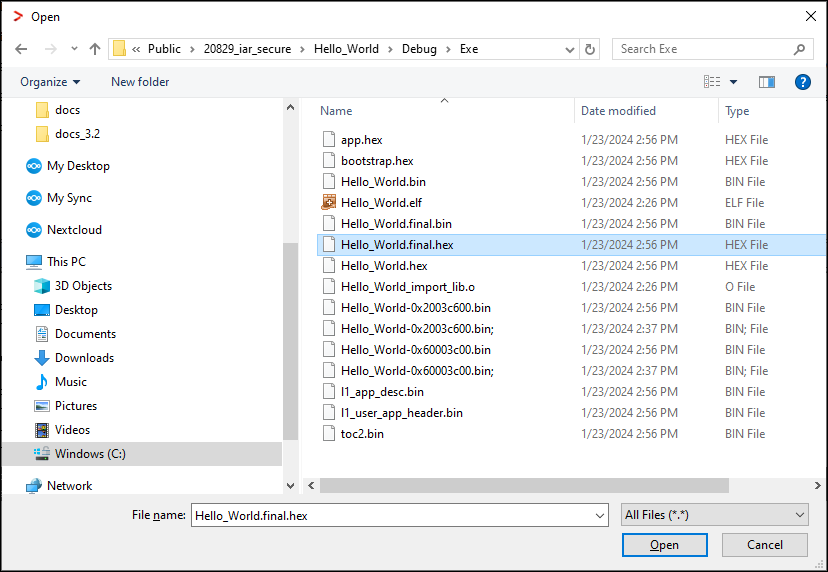
Select
Project >Debug without Downloading
.
PSOC™ Control C3 device configuration
To configure the Trust Zone mode, select
Project > Options > General Options > 32-bit
and choose the
Mode
for your application type: "Secure" or "Non-secure."
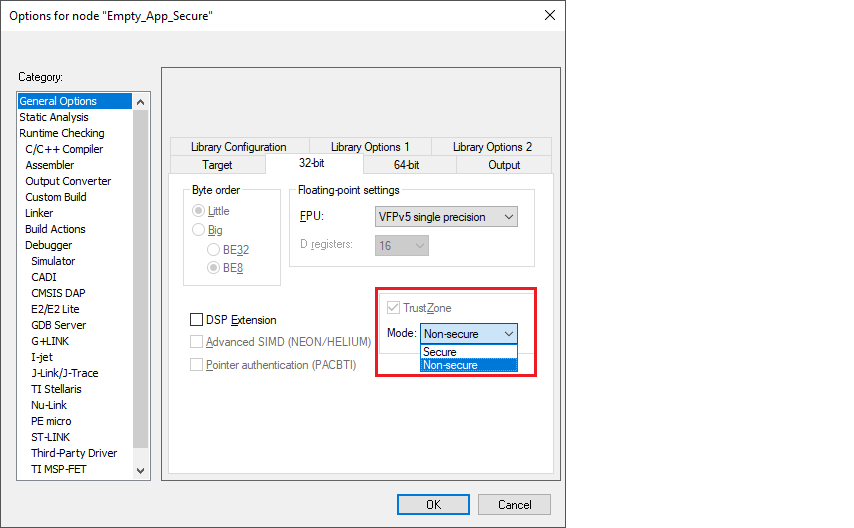
If you select Secure, the system will automatically add the required compiler and linker flags.
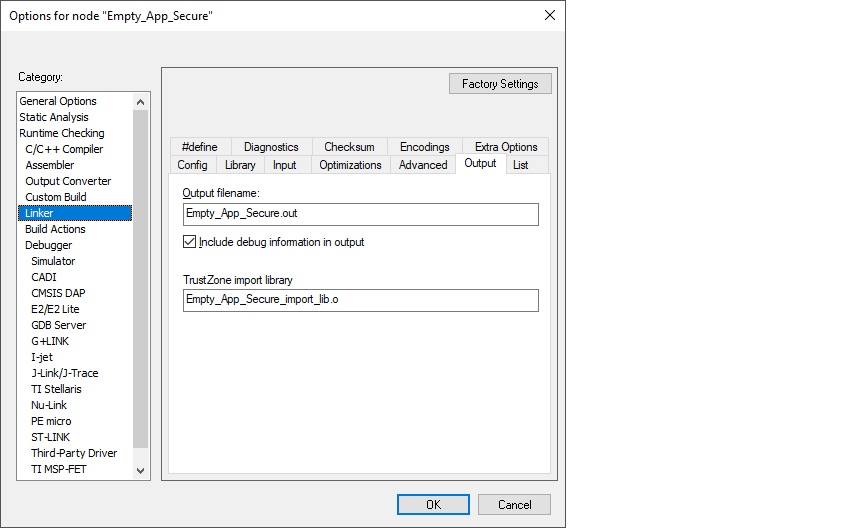
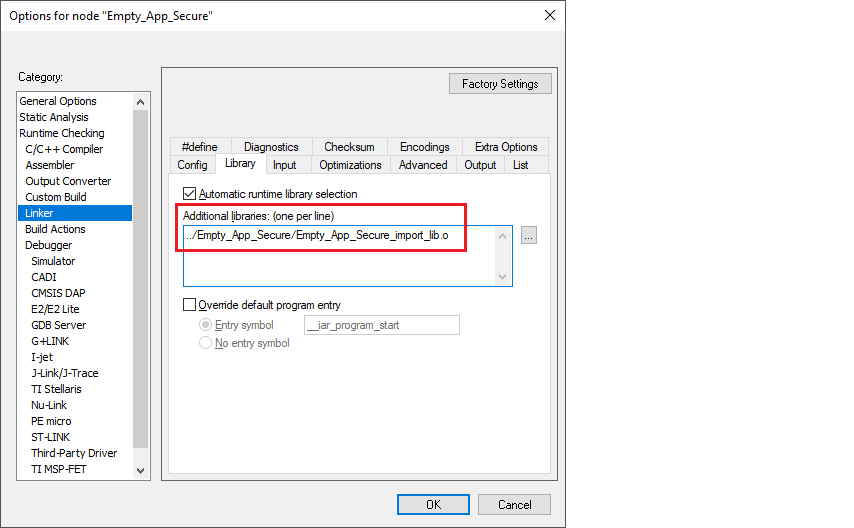
For non-secure projects, you must manually add the path of the generated import library to the linker flags. Select the
Library
tab under
Linker
, and enter the object file generated by the secure project as a linker argument in
Additional libraries
.
Additionally an application build for a PSOC™ Control C3 device in Secure LCS should be signed with same key used during provisioning to Secure LCS using the ModusToolbox™ Edge Protect Security Suite. The application can be configured by adding an additional post-build script to the default build flow.
You must perform the following configuration steps:
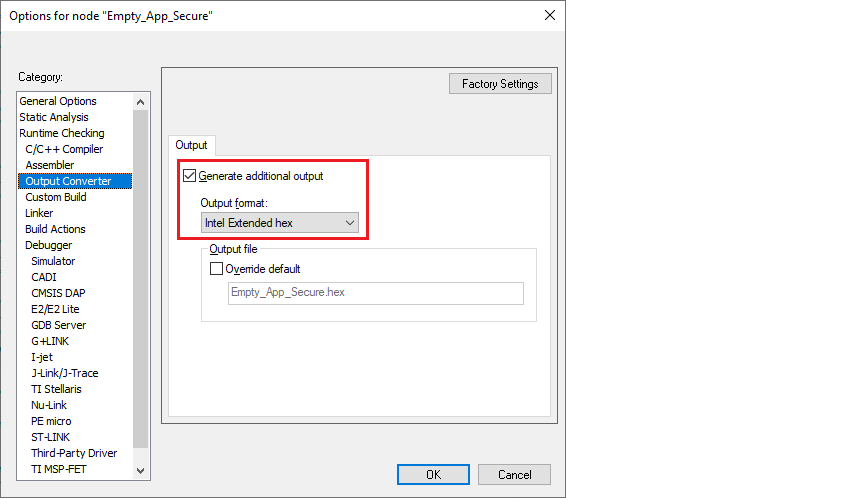
Select
Project > Options > Output Converter
, enable
Generate additional output
and select "Intel Hex file" in
Output format
:
Create postbuild.bat file in project root folder, and add sign-image command, for example:
C:\Users\<username>\ModusToolbox-Edge-Protect-Security-Suite-1.0\tools\edgeprotecttools\bin\edgeprotecttools sign-image --image "Debug/Exe/Empty_App.hex" --output "Debug/Exe/Empty_App.hex" --header-size 0x400 --slot-size 0x20000 --key keys/oem_rot_priv_key_0.pem --hex-addr 0x32000000 --align 1 --pad --security-counter 0 --erased-val 0 --public-key-format full --pubkey-encoding raw --signature-encoding raw --min-erase-size 0x200 --overwrite-onlyIn IAR, select
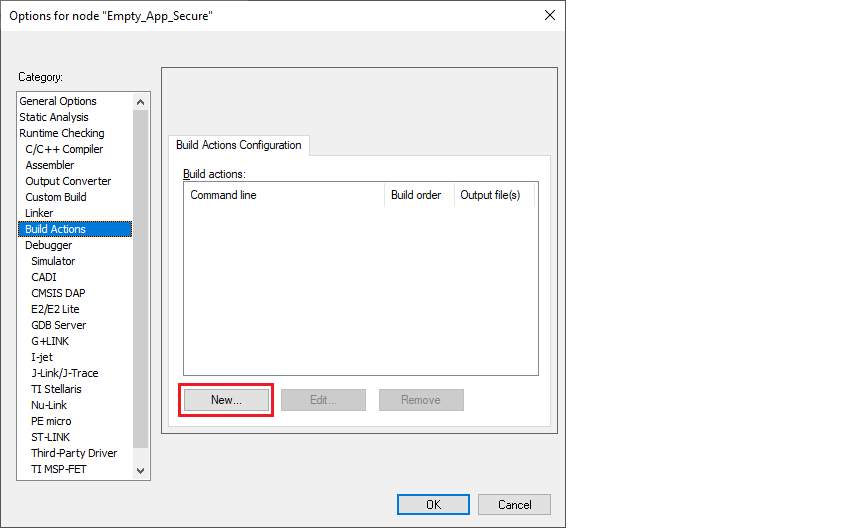
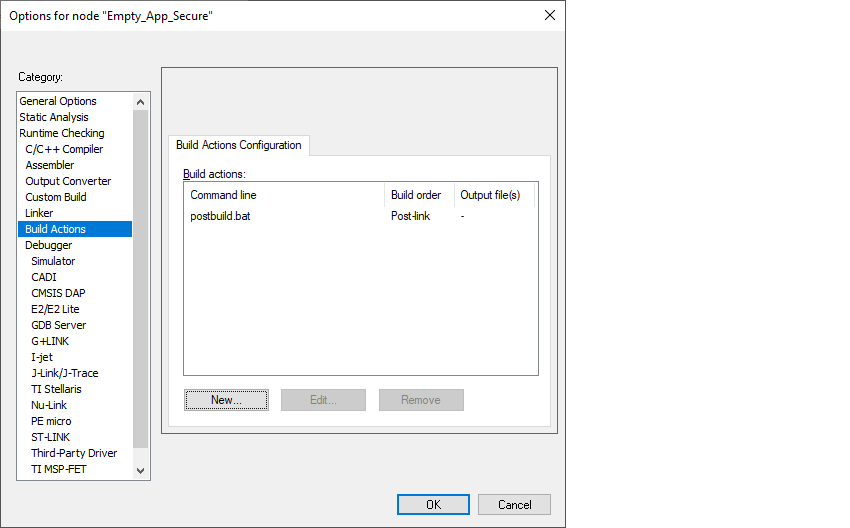
Project > Options > Build Actions
and click
New
:
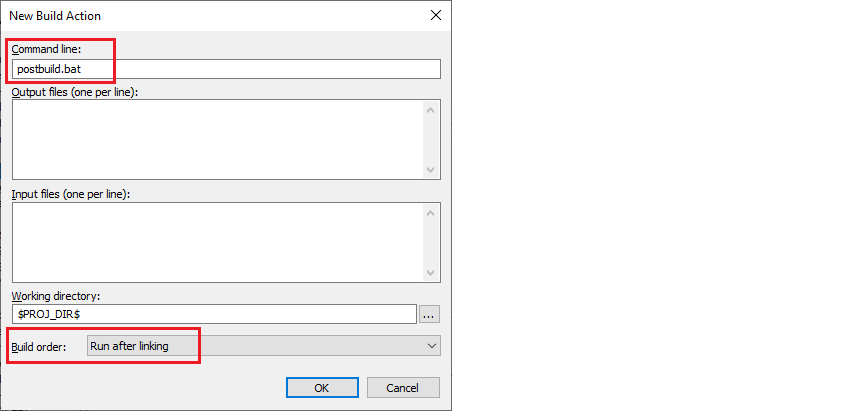
On the New Build Action dialog, type the
postbuild.bat
file in the
Command line
field, select "Run after linking" in the
Build order
field, and click
OK
:
Click
OK
to close the New Build Action dialog.
Click
OK
to close the Options dialog.
On the IAR main menu, select
Project > Make
to build the application.
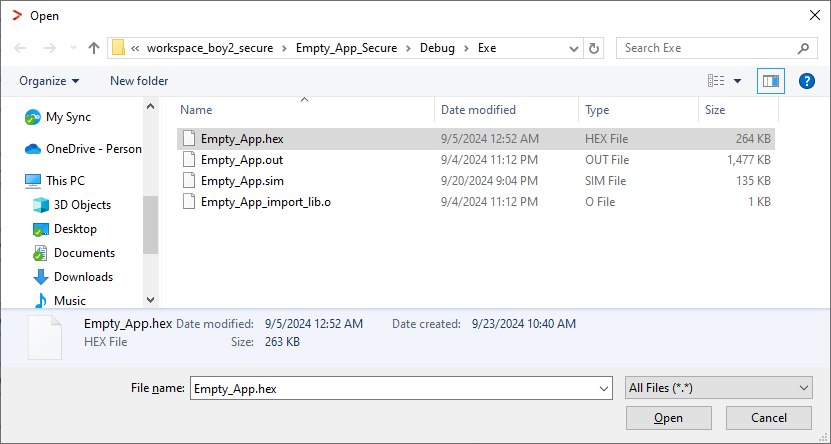
Select
Project > Download > Download file…
and select the
<project_name>.hex
file in
<project_root>\Debug\Exe
[you might have to switch to
All Files (.)
].
Select
Project >Debug without Downloading
.
You may encounter flash access restrictions based on the policy that was used to provision the target.
For Infineon PSOC™ Control C3 devices, the same physical flash memory can be erased/programmed over S-BUS either over non-secure addresses (0x22000000-0x2203FFFF) or over secure addresses (0x32000000-0x3203FFFF).
During flash programming operations, the CPU core operates in the secure world.
In this state, the non-secure addresses are always accessible, but secure addresses may be unavailable if certain regions are configured for non-secure access (for PSOC™ Control C3, this means non-secure access only).
To erase the entire flash memory, it's important to only erase the non-secure range of addresses.
